This Butter Mosaic Cake is a simple but beautiful vanilla-and-chocolate marble cake with a rich, buttery crumb and dramatic swirls in every slice. A vanilla butter batter is divided in two, one half is flavored with cocoa, and the two batters are layered and swirled together to create the signature mosaic pattern.
Heavy cream gives the cake extra richness and moisture without making it overly heavy. The flavor is classic—sweet vanilla, real butter, and cocoa—making it perfect with coffee or tea, as an afternoon snack, or as an easy everyday cake.
The best part is that every slice looks slightly different. You don't need to create a perfect pattern; a few strategic layers and gentle swirls will do the work.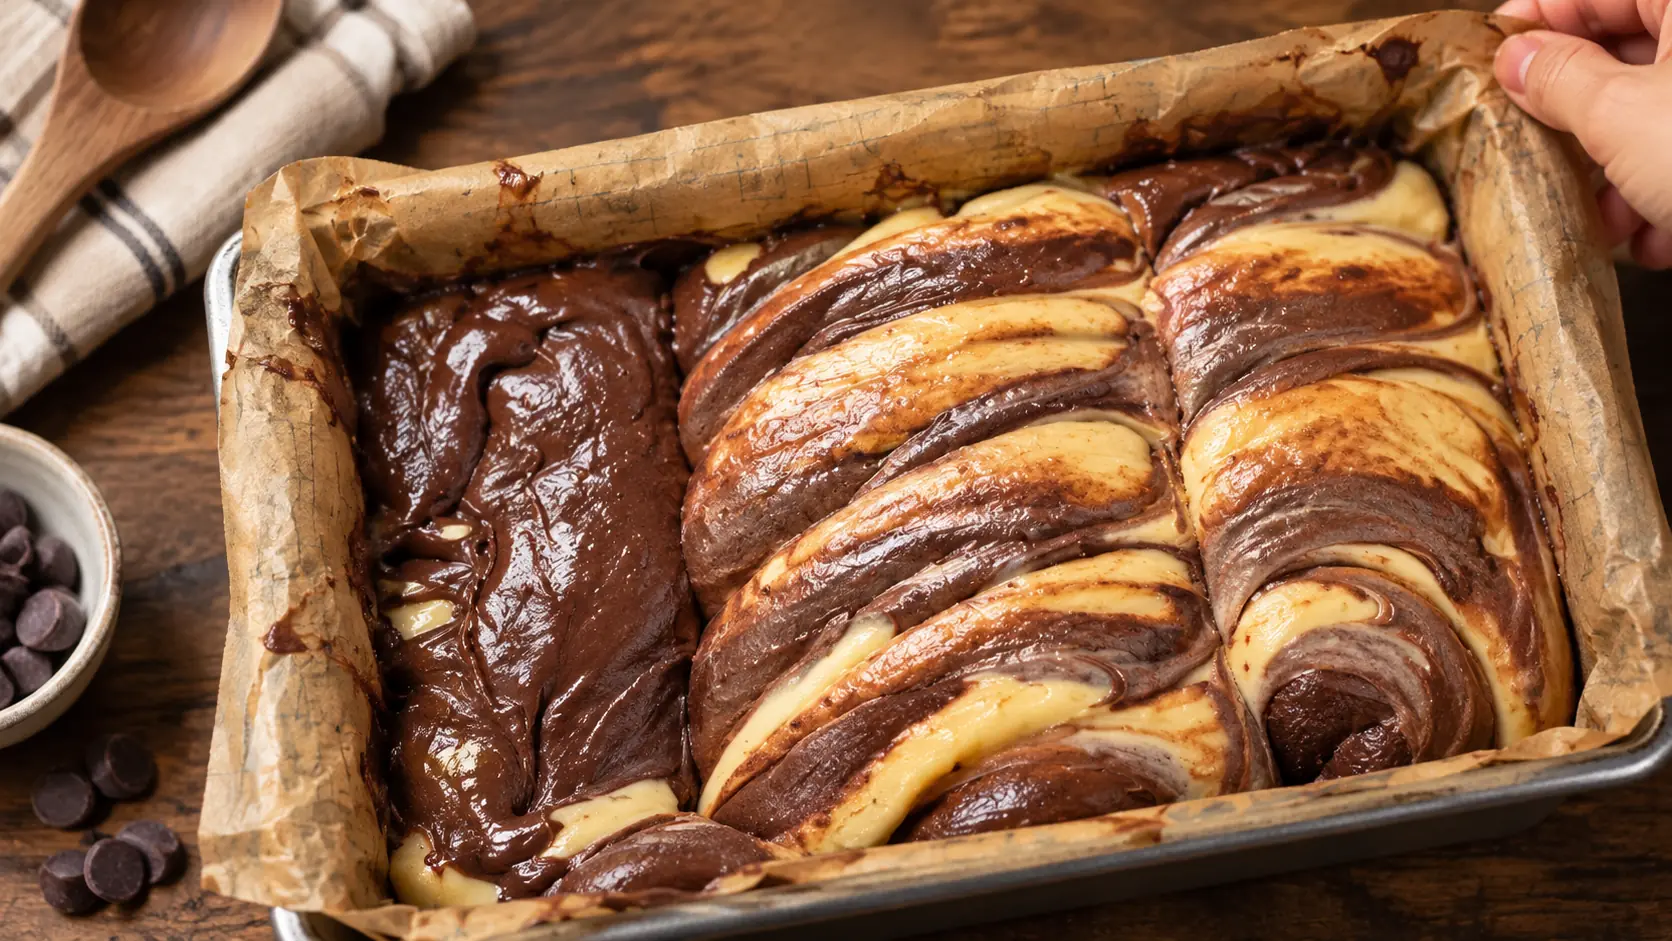
Ingredients
For the Vanilla Batter
- ½ cup + 1 tablespoon (125g) unsalted butter, softened to room temperature
- 1½ cups (300g) granulated sugar
- 4 large eggs, room temperature
- ¾ cup + 1 tablespoon (200ml) heavy cream, room temperature
- 2½ cups (300g) all-purpose flour
- 2½ teaspoons (10g) baking powder
- 2 teaspoons pure vanilla extract
- ¼ teaspoon fine salt
For the Chocolate Batter
- Half of the prepared vanilla batter
- 2 tablespoons (10–12g) unsweetened cocoa powder
Optional Finish
- Powdered sugar, for dusting
- Melted chocolate, for drizzling
How to Make Butter Mosaic Cake
Step 1 – Prepare the Pan
Preheat the oven to 340°F (170°C).
Generously butter and flour a 10-inch Bundt or tube pan, making sure to coat all the grooves.
Alternatively, use a large loaf or similar cake pan with enough capacity for the batter.
Tap out any excess flour.
Step 2 – Cream the Butter & Sugar
Place the softened butter and granulated sugar in a large mixing bowl.
Using a stand mixer or electric hand mixer, beat on medium-high speed for approximately 4–5 minutes, until the mixture becomes noticeably lighter and fluffy.
Scrape down the sides and bottom of the bowl several times.
The sugar may not completely dissolve into the butter, and that's perfectly normal. The important goal is to incorporate air into the mixture.
Step 3 – Add the Eggs One at a Time
Add the eggs one at a time, beating well after each addition.
Wait until each egg is mostly incorporated before adding the next.
Scrape down the bowl as necessary.
Adding the eggs gradually is particularly important in a butter-based cake because it helps maintain a stable emulsion rather than overwhelming the butter with liquid all at once.
Step 4 – Add the Cream & Vanilla
Add the heavy cream and vanilla extract.
Mix on low to medium-low speed just until incorporated.
If the mixture looks slightly curdled at this stage, don't panic. It will usually come together once the flour is added.
Step 5 – Combine the Dry Ingredients
In a separate bowl, whisk together:
- All-purpose flour
- Baking powder
- Salt
Whisk thoroughly so the baking powder is evenly distributed.
Step 6 – Finish the Vanilla Batter
Add the dry ingredients to the wet mixture.
Mix on the lowest mixer setting only until most of the flour disappears.
Stop the mixer and finish folding gently with a rubber spatula.
Avoid beating the batter until perfectly smooth. Overmixing at this stage can make the finished cake unnecessarily dense or tough.
Make the Chocolate Batter
Divide the batter approximately evenly between two bowls.
Sift 2 tablespoons cocoa powder over one portion.
Gently fold until the cocoa is incorporated and the batter has an even chocolate color.
Don't aggressively beat the cocoa into the batter.
If the chocolate batter becomes noticeably thicker than the vanilla portion, stir in 1 tablespoon heavy cream to bring the two batters closer to the same consistency.
This makes them easier to marble.
Create the Mosaic Pattern
There are several ways to create the pattern, but alternating spoonfuls gives particularly attractive slices.
Spoon several dollops of vanilla batter into the prepared pan.
Add dollops of chocolate batter beside and partially over the vanilla.
Continue alternating the two batters until everything has been added.
For a more defined layered mosaic, alternate larger sections of vanilla and chocolate rather than mixing them evenly.
Swirl the Cake
Insert a butter knife or wooden skewer into the batter.
Move it through the pan in 2–3 gentle figure-eight motions.
Stop there.
Don't repeatedly stir the batter or the vanilla and chocolate will blend together and you'll lose the distinctive mosaic effect.
Smooth the top gently.
Bake
Bake at 340°F (170°C) for approximately 40–50 minutes.
This rich butter-and-cream batter can bake somewhat slowly, so don't increase the oven temperature just because the center isn't ready at 40 minutes.
Begin checking around the 40-minute mark.
The cake is ready when:
- the top is golden,
- the cake springs back lightly when touched,
- and a toothpick inserted into a thick portion comes out clean or with a few moist crumbs.
A completely wet streak of batter means it needs additional time.
If the surface becomes too dark before the center is finished, loosely tent the cake with aluminum foil.
Cool the Cake
Let the cake cool in the pan for approximately 15 minutes.
Carefully loosen the edges if necessary, then invert it onto a wire rack.
Allow it to cool completely before slicing.
Cutting while the cake is very hot can compress the tender crumb and make the mosaic pattern less clean.
Chef's Tips for the Best Butter Mosaic Cake
- Use truly softened butter, not melted butter. It should indent easily when pressed but shouldn't look greasy.
- Room-temperature eggs incorporate much more smoothly into creamed butter.
- Add the eggs individually. This is one of the most important steps in this recipe.
- Cream the butter and sugar thoroughly before adding other ingredients.
- Don't expect every sugar crystal to literally disappear during creaming.
- Use heavy cream rather than whipped cream.
- Once flour is added, mix as little as possible.
- Sift cocoa if it contains lumps.
- Keep the vanilla and chocolate batters close to the same consistency.
- Don't over-swirl. A few movements create a mosaic; excessive swirling creates muddy brown batter.
- Thoroughly grease a decorative Bundt pan because this buttery cake can stick in detailed grooves.
- Let the cake rest before unmolding.
The Secret to a Tender Butter Cake
The texture begins with proper creaming.
When softened butter and sugar are beaten together, the sugar creates thousands of tiny pockets in the butter. Those pockets trap air, which expands as the cake bakes.
The eggs then need to be incorporated gradually so the fat-and-liquid mixture remains emulsified.
That's why adding all four eggs at once isn't ideal.
Once the flour enters the bowl, however, the goal changes completely: stop incorporating air and start protecting tenderness.
Mix on low only until combined, then finish by hand.
The Secret to a Beautiful Mosaic Pattern
The two batters should remain visibly separate before baking.
Think of the goal as layering rather than mixing.
Alternate spoonfuls of vanilla and chocolate batter throughout the pan, then make only a few passes with a skewer or knife.
During baking, the batter expands and shifts naturally, creating irregular ribbons, pockets, and waves of chocolate.
That randomness is exactly what gives each slice its mosaic appearance.
For an Even Richer Chocolate Swirl
For a deeper chocolate section, combine:
- 2 tablespoons unsweetened cocoa powder
- 1 tablespoon heavy cream
- 1 teaspoon sugar
Mix into half of the vanilla batter.
The extra cream compensates for some of the moisture absorbed by the cocoa, while the small amount of sugar keeps the chocolate portion from tasting noticeably less sweet than the vanilla batter.
Delicious Variations
Chocolate Orange Mosaic Cake
Add 1 tablespoon finely grated orange zest to the vanilla batter. Chocolate and orange work beautifully together.
Coffee Chocolate Mosaic
Dissolve 1 teaspoon instant espresso powder in 1 tablespoon warm cream and add it to the cocoa batter.
Almond Vanilla
Add ¼–½ teaspoon almond extract alongside the vanilla.
Chocolate Chip Mosaic
Fold ½ cup mini chocolate chips into the finished batter before creating the marble pattern.
Hazelnut Mosaic
Add finely chopped toasted hazelnuts to the chocolate portion.
Lemon Chocolate Marble
Add fresh lemon zest to the vanilla portion for a brighter contrast against the cocoa.
Simple Chocolate Glaze
If you want to turn the everyday cake into a more decadent dessert, make a quick glaze with:
- 4 ounces (113g) semisweet chocolate, finely chopped
- ⅓ cup (80ml) heavy cream
Heat the cream until steaming but not boiling.
Pour it over the chocolate and let stand for 2–3 minutes.
Stir until smooth and glossy.
Allow the glaze to cool slightly before pouring it over the completely cooled cake.
What to Serve With Butter Mosaic Cake
This cake pairs especially well with:
- Hot coffee
- Espresso
- Cappuccino
- Black tea
- Cold milk
- Fresh strawberries
- Raspberries
- Vanilla ice cream
- Lightly sweetened whipped cream
For a simple afternoon treat, it needs nothing more than a cup of coffee and a light dusting of powdered sugar.
Make-Ahead Tips
Butter Mosaic Cake is an excellent make-ahead dessert.
Bake it one day before serving, cool completely, and store tightly covered at room temperature.
In fact, the flavor and texture can be even better the following day once the moisture has settled evenly throughout the crumb.
Wait until shortly before serving to add powdered sugar.
If using chocolate glaze, it can be added once the cake is completely cool.
Storage
Room Temperature
Store the completely cooled unglazed cake in an airtight container for up to 3 days.
Refrigerator
The cake can be refrigerated for approximately 4–5 days, although refrigeration will firm the butter and make the crumb feel denser.
Bring slices to room temperature before serving.
Freezer
Wrap individual slices or the entire cooled unglazed cake tightly.
Freeze for up to 2 months.
Thaw overnight in the refrigerator, then bring to room temperature before serving.
Notes
- Makes approximately 12 servings.
- The original 200ml measuring glass converts the flour to approximately 300g, which is about 2½ U.S. cups when measured appropriately.
- Use pure vanilla extract in place of packet vanilla for a convenient U.S. grocery-store version.
- One standard packet of baking powder can vary by country, so this version uses approximately 2½ teaspoons (10g).
- Natural or Dutch-process unsweetened cocoa can be used for the small chocolate portion.
- Avoid overbaking; butter cakes can become dry when left in the oven unnecessarily.
- If using a very deep pan, the cake may require slightly longer than 45 minutes.
- For the prettiest presentation, slice the completely cooled cake with a sharp knife so every piece clearly reveals the irregular vanilla-and-chocolate ribbons that create the signature mosaic interior.