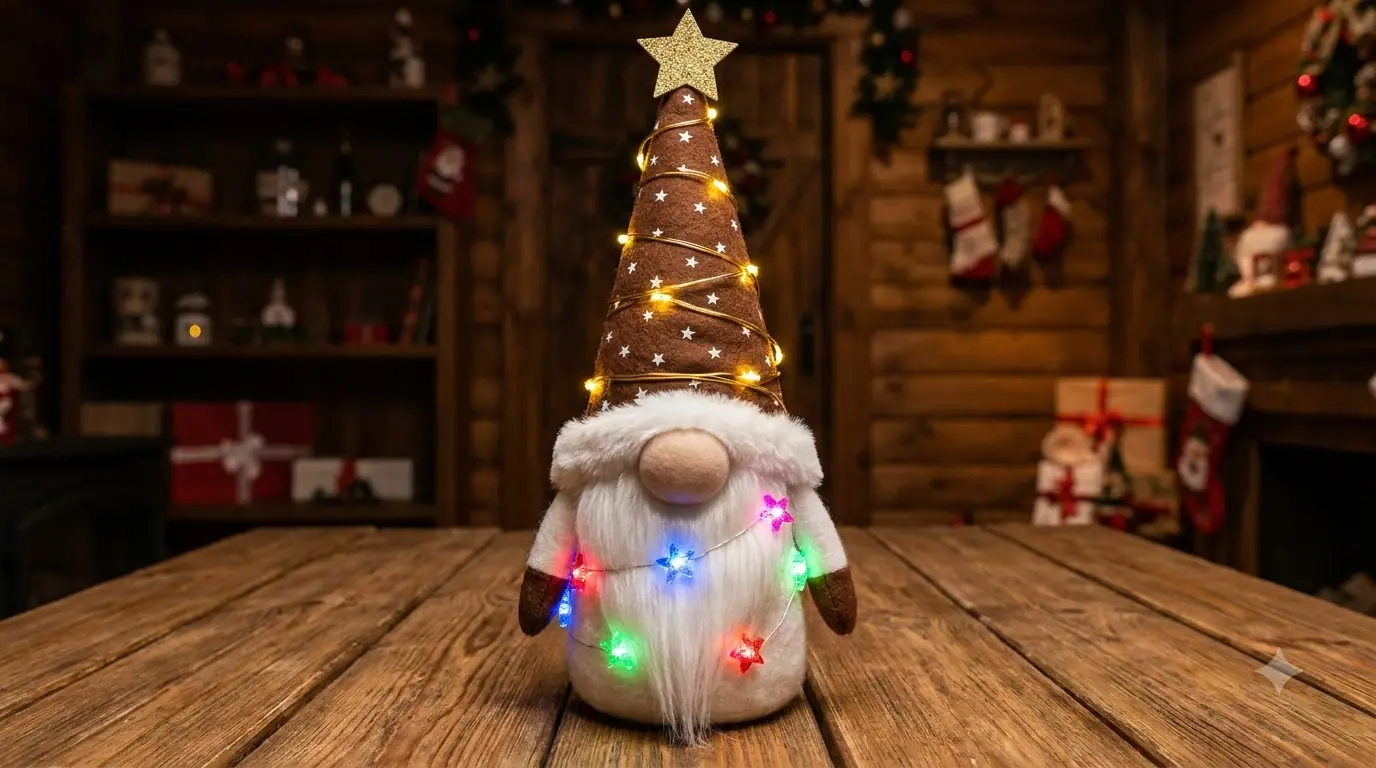
A Christmas decoration does not have to be complicated to feel special. This DIY light-up Christmas gnome tree combines the shape of a traditional gnome with the silhouette of a Christmas tree, creating a handmade holiday decoration that looks playful during the day and glows beautifully at night.
The finished piece has a tall cone-shaped hat covered in soft brown fabric with a tiny white star pattern, a glittery star topper, a fluffy white beard, a round fabric nose, soft mitten-like hands, and a glowing body filled with colorful lights. A strand of warm mini lights is also wrapped around the tall hat, giving the decoration the appearance of a tiny illuminated Christmas tree.
This project is especially charming because the structure is built from relatively simple materials: a lightweight container or vase-shaped base, fabric, faux fur, cardboard, stuffing, and battery-powered lights.
It works beautifully on a console table, fireplace mantel, entryway shelf, covered porch, or Christmas display.
What Is a Christmas Gnome Tree?
A Christmas gnome tree is a decorative holiday figure that combines two familiar Christmas motifs.
The lower half resembles a Scandinavian-style gnome, with a large fluffy beard and oversized round nose. The upper half extends into a tall pointed hat shaped almost like a Christmas tree.
In the project shown, the hat is wrapped with warm string lights and topped with a glittery star. The lower body contains additional colored holiday lights that shine through the soft material and beard.
The result is a decoration that feels halfway between a gnome, a Christmas tree, and a glowing tabletop lantern.
Because the design does not require detailed facial features, it is relatively forgiving for beginners.
Materials and Tools Needed
To make a similar Christmas gnome, gather:
- One rounded lightweight container, vase, or sturdy hollow base
- Cardboard or thick cardstock
- Brown fabric with a small star pattern
- White faux fur
- Beige or light taupe fabric
- Polyester stuffing
- White felt or fleece
- Battery-operated warm white string lights
- Battery-operated multicolor mini lights
- Glitter foam or glitter cardstock
- Thin craft wire
- Hot glue gun
- Glue sticks
- Fabric scissors
- Regular scissors
- Craft knife
- Pencil
- Ruler
- Needle and thread, optional
- Small elastic bands or string
- Clear tape
- Wooden skewer or thin dowel, optional
- Small weights or pebbles, optional
For safety, use LED battery-powered lights only. They remain much cooler than traditional bulbs and are better suited for fabric-based crafts.
Step 1: Prepare the Main Body
Start with a rounded container or lightweight vase-shaped form.
The example in the video uses a structure with a wide rounded body and a narrower opening at the top.
If the surface is visible through the final decoration, cover it with light-colored fabric, textured paper, or yarn.
Secure the covering using small amounts of hot glue.
If the container feels too light, add a few pebbles or another small weight inside the bottom.
This prevents the tall hat from making the finished gnome top-heavy.
Step 2: Create the Gnome's Arms
Cut two narrow strips of matching fabric.
Roll or fold each strip lengthwise to form a soft arm.
Secure the seam with hot glue or simple stitching.
Stuff the arms very lightly if you want them to look fuller.
The arms should remain flexible rather than rigid.
Attach one arm to each side of the body, angled slightly downward.
Step 3: Make the Soft Mittens
Cut four small mitten shapes from white felt or fleece.
Glue or sew two pieces together for each hand.
Leave a small opening at the wrist.
Insert the end of each arm into the mitten and secure it.
The hands should be simple and rounded. Individual fingers are unnecessary and would make the design look overly detailed.
Step 4: Add the White Faux-Fur Beard
The beard is one of the most important visual features.
Cut a wide triangular or rounded section of white faux fur.
When cutting faux fur, try to cut only through the backing rather than cutting deeply through the fibers. This preserves the long fluffy strands along the edges.
Position the beard across the front of the body.
The upper edge should sit slightly below the opening where the hat will eventually begin.
Allow the lower portion to extend down across the body.
Attach the beard using hot glue along the backing.
Fluff the fur afterward so the glue line disappears.
Step 5: Make the Round Gnome Nose
Cut a circle from beige or taupe fabric.
Place a small amount of polyester stuffing in the center.
Pull the edges of the fabric around the stuffing to create a rounded ball.
Secure the back using thread, an elastic band, or hot glue.
The finished nose should be large and soft rather than perfectly spherical.
Attach it at the center of the beard, close to the upper edge.
The hat will later sit slightly over the nose, creating the classic gnome appearance.
Step 6: Build the Tall Cone Hat
The dramatic hat is what turns this project into a Christmas-tree-style gnome.
Use thick cardstock or lightweight cardboard to create a large cone.
Begin by drawing and cutting a broad triangular or fan-shaped section.
Roll it into a cone and adjust the overlap until you achieve the desired height and width.
The base of the cone should fit comfortably over the top portion of the gnome body.
Secure the overlapping cardboard with hot glue or strong tape.
Make sure the cone is lightweight but firm enough to maintain its shape.
Step 7: Cover the Cone With Fabric
Lay the brown star-patterned fabric flat on the work surface.
Place the cardboard cone on top and determine how much material is required.
Cut the fabric with enough extra allowance to wrap around the cone.
Apply glue gradually rather than covering the entire structure at once.
Smooth the fabric around the cone while keeping the pattern relatively straight.
Fold the excess material neatly along the back seam and glue it down.
At the bottom, trim the fabric while leaving a small allowance that can be folded inward.
The finished cone should look clean without large wrinkles.
Step 8: Add the White Fur Hat Trim
Cut a strip of white faux fur long enough to wrap around the bottom edge of the hat.
Keep the strip relatively narrow.
Attach it around the cone using hot glue.
The fluffy trim creates a visual transition between the tall hat and the beard.
Make sure the seam is positioned toward the back.
Step 9: Attach the Hat
Place the completed cone onto the top of the gnome body.
Tilt it slightly if desired.
A small forward angle can make the gnome appear more playful.
Position the bottom edge so it overlaps the top of the beard and sits just above the large nose.
Once the placement looks correct, secure the hat to the body.
Check that the entire decoration still stands upright.
Step 10: Make the Glitter Star Topper
Draw a five-pointed star on glitter foam or thick glitter cardstock.
Cut out two matching stars if you want the topper to look finished from both sides.
Glue the stars together around the end of a wooden skewer, wire, or narrow strip of cardboard.
Insert or attach the support to the tip of the cone.
Secure it firmly.
The star should remain proportionate to the hat rather than becoming so large that the top bends.
Step 11: Wrap Warm Lights Around the Hat
Use a small battery-powered strand of warm white LED lights.
Begin near the top and wrap the wire loosely around the cone in a spiral.
Continue downward toward the base.
Keep the spacing irregular enough to feel handmade but balanced enough that every section of the hat receives some light.
Secure the wire in a few hidden locations using clear tape, fine thread, or tiny dots of glue.
Do not glue directly onto the LED bulbs.
Place the battery compartment behind the gnome where it remains accessible.
Step 12: Add Colored Lights to the Lower Body
The lower section of the finished gnome glows with colorful holiday lights.
Place a short strand of multicolor battery-powered LEDs around or inside the lower body.
Depending on the construction of your base, the lights can be positioned beneath the faux fur or around the bottom perimeter.
Allow several small illuminated star-shaped bulbs or colorful points to remain visible around the sides.
Avoid concentrating every bulb in one location.
Distribute them around the front and lower sides to create an even glow.
Step 13: Hide the Wiring
Carefully route the light wires along the back.
Tuck loose sections beneath the fur or fabric where possible.
The battery packs should remain reachable.
A small fabric pocket on the back can be added to hold them.
Never permanently seal the battery compartment inside the decoration because batteries will eventually need to be changed.
Step 14: Fluff and Shape the Beard
Once the lights and hat are installed, use your fingers or a wide-tooth comb to gently arrange the beard.
Pull a little fur forward around the nose.
Allow some longer fibers to hang loosely.
The beard should not look perfectly symmetrical.
A slightly wild texture gives the gnome more personality.
Step 15: Final Lighting Test
Place the gnome on a flat surface.
Turn on the warm lights around the hat first.
Check that the light spiral is evenly distributed.
Then activate the colored lights around the lower body.
The brown hat should glow softly from the warm LEDs, while the beard and lower body reflect pink, blue, yellow, and other colored highlights.
Turn off some of the room lighting to see how the decoration looks at night.
Make any final adjustments before displaying it.
Tips for a Better Finished Gnome
Keep the hat tall.
The exaggerated cone is what gives this decoration its Christmas-tree character.
Use long-pile faux fur for the beard. Short fur can make the lower half look flat.
Place the nose partly underneath the hat brim rather than leaving a large gap above it.
Avoid wrapping the string lights too tightly. A loose spiral looks more natural and creates better visual separation between bulbs.
Also make sure the base is heavy enough.
The taller the hat, the more important stability becomes.
Safe Lighting Tips
Always use cool-running LEDs.
Do not place incandescent bulbs, candles, or open flames anywhere near the fabric or faux fur.
Switch the decoration off when leaving home for extended periods.
Inspect wires before use and replace damaged light strands.
Keep battery compartments dry and accessible.
If children or pets can reach the decoration, make sure small parts and battery boxes cannot be easily removed.
Where to Display the Finished Gnome
This project works well in several indoor Christmas settings:
- Fireplace mantel
- Entryway table
- Console table
- Bookshelf
- Christmas village display
- Dining room sideboard
- Covered porch
- Holiday party table
For the best nighttime effect, place it somewhere where the surrounding lighting can be slightly dimmed.
The glowing hat and colorful lower body become much more noticeable.
Storage After Christmas
Remove the batteries before long-term storage.
This prevents battery leakage from damaging the lights.
Gently coil the loose wiring.
Do not crush the tall cone.
If possible, place the entire gnome upright inside a tall storage box.
Loosely cover the beard with tissue paper or a lightweight bag so the fur remains clean without becoming flattened.
Store it in a dry indoor location.
A Handmade Christmas Decoration That Glows
This DIY light-up Christmas gnome tree combines several simple craft techniques into one distinctive holiday decoration.
The rounded base creates the body, faux fur forms the oversized beard, a stuffed fabric ball becomes the nose, and a tall fabric-covered cardboard cone turns into the tree-like hat.
The star topper and two types of LED lighting bring the entire project together.
When the lights are off, it looks like a soft handmade Christmas gnome. Once illuminated, the warm spiral around the hat and colorful glow beneath the beard transform it into a bright holiday centerpiece.
It is playful, customizable, and easy to adapt with different fabrics, light colors, or decorations—making it a memorable DIY project that can return to your Christmas display year after year.