What Is a Circular Garden Island?
A circular garden island is a freestanding planting bed surrounded by lawn or another open landscape.
Unlike a flower bed that runs along a wall or fence, a garden island is designed to be viewed from several directions. This makes plant height, spacing, color balance, and edging especially important.
In this design, the circular structure is divided into two visual zones.
The inner raised bed contains the ornamental tree, flowering plants, compact shrubs, and the decorative terracotta pot.
The outer ring uses smooth white and dark pebbles arranged in a flowing pattern, bordered by rectangular landscape pavers. Small solar lights are spaced around the perimeter.
That combination of plants, stone, and lighting makes the project look much more intentional than a simple flower bed.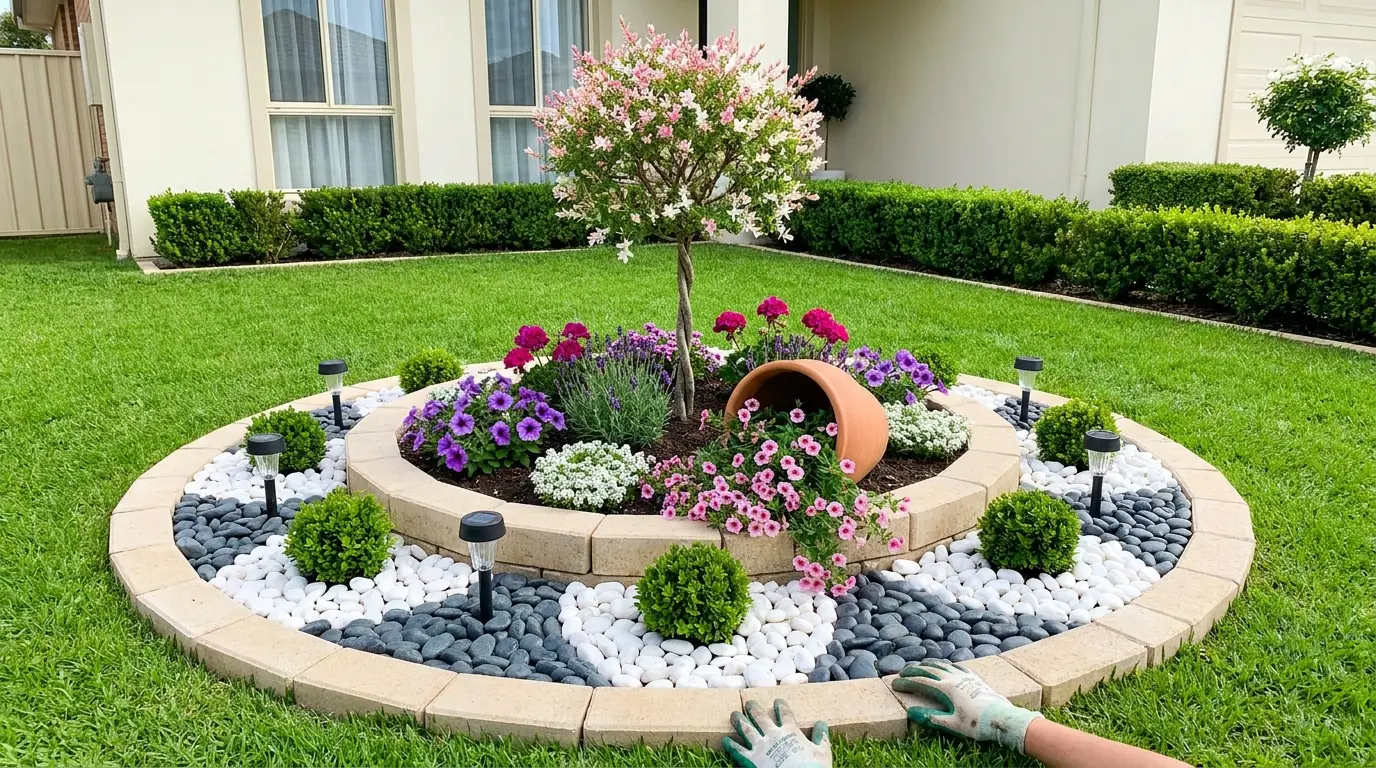
Materials and Tools Needed
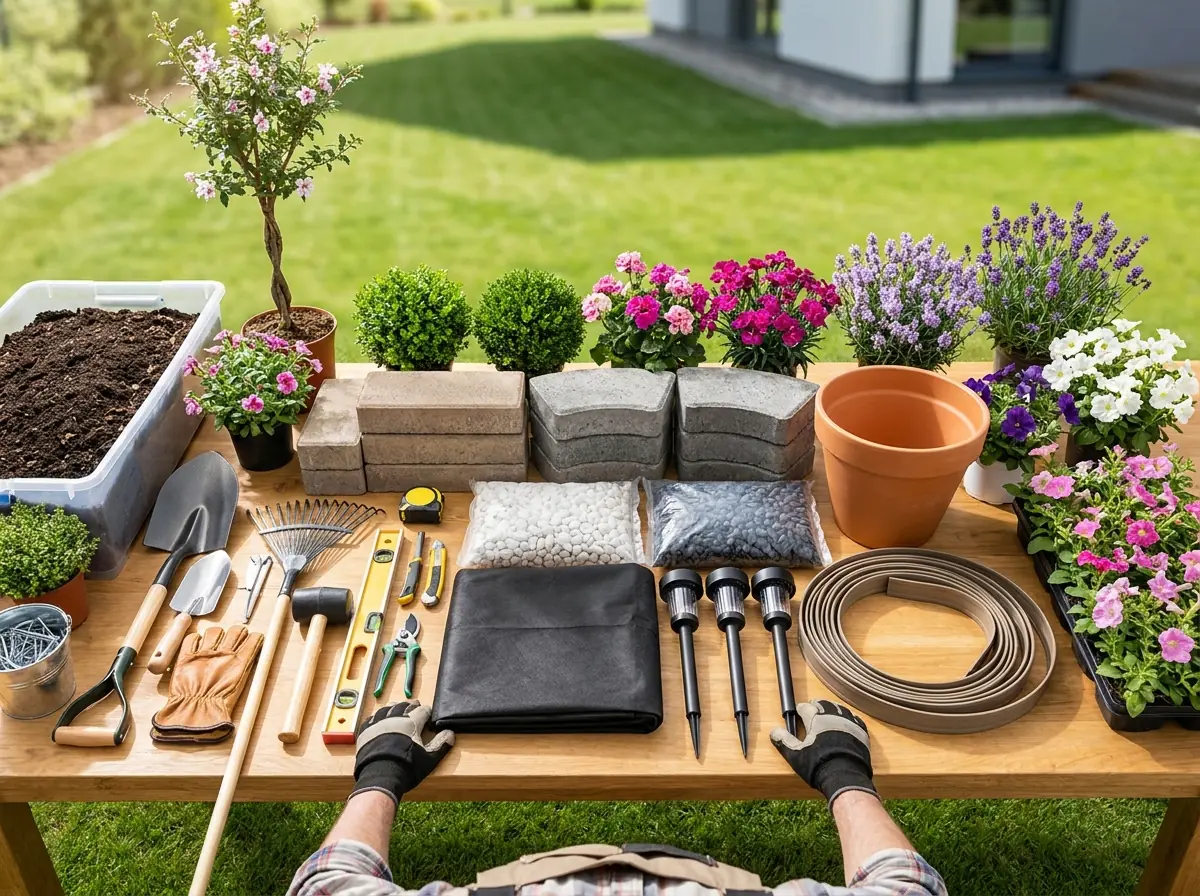
To build a similar garden feature, gather:
Landscaping Materials
- Rectangular landscape edging blocks or pavers
- Additional curved or retaining-wall blocks for the raised inner bed
- Landscape fabric
- Garden soil
- Compost
- Mulch, optional
- White decorative river pebbles
- Dark gray or black pebbles
- Small solar pathway lights
- One large terracotta pot
- Landscape edging or flexible divider strips for the pebble design
Plants
- One small ornamental flowering tree
- Compact evergreen shrubs
- Pink flowering annuals or perennials
- White flowering plants
- Purple flowering plants
- Lavender or similar upright flowering plants
- Trailing flowers for the overturned pot
- Low-growing border plants
Good plant choices may include:
- Lavender
- Petunias
- Alyssum
- Verbena
- Dianthus
- Salvia
- Lantana
- Calibrachoa
- Dwarf boxwood
- Compact evergreen shrubs
Choose varieties that are appropriate for your USDA growing zone and the amount of sunlight the location receives.
Tools
- Garden shovel
- Hand trowel
- Landscape rake
- Rubber mallet
- Measuring tape
- Garden hose or marking paint
- Level
- Wheelbarrow
- Gardening gloves
- Pruning shears
- Tamper
- Utility knife for landscape fabric
Step 1: Choose the Right Location
Select an open section of lawn with enough room to appreciate the circular shape.
The location should receive the amount of sunlight required by your chosen plants. Most flowering landscapes perform best with at least six hours of direct sunlight each day, although plant requirements vary.
Avoid placing the bed directly over major utility lines or underground irrigation components.
Before digging deeply, contact the appropriate utility marking service in your area.
Step 2: Mark the Outer Circle
Use a stake and string to create a consistent circle.
Push a stake into the center of the future garden bed, tie a string to it, and measure outward to establish the radius.
Walk around the center while marking the ground with landscape paint or by placing a garden hose along the circle.
For a substantial front-yard display, an outer diameter of roughly 10 to 14 feet can work well, depending on the property.
The exact size is flexible.
What matters is maintaining a clean circle.
Step 3: Remove the Grass
Cut along the marked perimeter using a flat shovel or edging tool.
Remove the grass and roots from the entire project area.
If the project includes both a planting bed and pebble ring, remove the sod from both areas at this stage.
Rake the soil smooth.
For the stone area, excavate enough soil to accommodate landscape fabric and the depth of the decorative pebbles.
Step 4: Install the Outer Paver Border
Lay rectangular landscape blocks around the perimeter.
Prepare a shallow trench and compact the soil beneath the blocks.
If the ground is uneven, add a thin layer of leveling sand or compactable paver base.
Set each block closely beside the next.
Use a rubber mallet to make small adjustments.
Check the height frequently with a level.
A smooth, consistent border is one of the details that makes the finished garden look professionally installed.
Step 5: Create the Raised Inner Bed
Mark a second circle inside the outer ring.
This inner circle will hold the tree, shrubs, and flowers.
Install low retaining-wall blocks around this section.
One or two courses of blocks are often enough to create a subtle raised bed.
If stacking multiple courses, stagger the joints between rows for stability.
The finished inner bed should be wide enough to provide healthy root space around the central tree.
Step 6: Prepare the Planting Soil
Loosen the existing soil in the inner garden area.
Mix in compost and quality garden soil.
Avoid piling excessive soil directly against the future tree trunk.
The goal is to create a rich but well-draining planting environment.
If your yard has heavy clay, incorporate suitable amendments or use raised-bed soil to improve drainage.
Step 7: Plant the Ornamental Tree
Place the ornamental tree near the center of the raised bed.
A small flowering tree with an attractive branching structure works especially well.
Examples may include certain varieties of:
- Crape myrtle
- Dogwood
- Redbud
- Magnolia
- Flowering cherry
Availability and suitability depend heavily on local climate.
Dig a planting hole approximately two to three times wider than the root ball but no deeper than the root ball itself.
Position the root flare at or slightly above the surrounding soil level.
Backfill carefully and water thoroughly.
Do not bury the trunk.
Step 8: Add Structural Evergreen Plants
Once the tree is established, add several compact shrubs around the lower portion of the bed.
Small rounded evergreen shrubs provide permanent structure even when seasonal flowers are not blooming.
Space them according to their mature size.
A common mistake is planting shrubs too closely because they look small at installation.
Leave enough room for healthy growth.
Step 9: Layer the Flowers
Arrange the flowers before planting.
Keep taller plants toward the center and medium-height plants farther outward.
Low-growing flowers can be positioned near the border.
Use repeated clusters of color instead of placing one flower of every type randomly.
For example, combine:
- Purple lavender or salvia
- White alyssum
- Bright pink petunias
- Magenta verbena
- Soft lavender flowers
Repeating the same colors around the circle creates visual unity.
Step 10: Add the Spilled Flower Pot
One of the most distinctive features in this garden is the large terracotta pot lying on its side.
Choose a large pot with a weathered or natural finish.
Place it on the soil at a slight angle.
Partially bury the lower side so the container looks naturally settled into the landscape.
Fill the pot with potting mix and plant trailing flowers inside.
Continue planting several of the same flowers directly in front of the opening so they appear to be spilling out of the pot.
Calibrachoa, petunias, lobelia, creeping phlox, and alyssum are good candidates.
Step 11: Install Landscape Fabric in the Pebble Ring
After completing the inner planting bed, prepare the outer stone area.
Lay landscape fabric over the exposed soil.
Overlap seams by several inches.
Cut carefully around the raised bed, lights, and any other permanent elements.
Secure the fabric using landscape staples.
Landscape fabric helps keep the decorative stone separated from the soil and can reduce weed growth.
Step 12: Design the Pebble Mosaic
The outer ring shown uses contrasting white and dark pebbles to create a flowing decorative pattern.
Before adding stone, lay flexible landscape edging or divider strips on top of the fabric.
Create several broad curved shapes.
Do not make the pattern overly complicated.
Large flowing sections are easier to install and easier to maintain.
Once the dividers are positioned, fill alternating sections with white and dark pebbles.
Rake the stones gently until they form an even layer.
Step 13: Install Solar Garden Lights
Place solar pathway lights around the outer ring.
Space them evenly.
Four to six lights may be enough for a medium-sized garden feature.
Push each stake firmly into the ground.
Keep the solar panels unobstructed by nearby plants so they receive sufficient sunlight.
At night, the lights highlight the circular shape and make the garden visible from the house or walkway.
Step 14: Water Everything Thoroughly
Immediately after planting, water the entire inner bed deeply.
Water each plant at its base rather than simply spraying the foliage.
The newly planted tree requires especially consistent watering during establishment.
Monitor the soil during the first growing season.
New plants generally require more attention than established landscaping.
How to Keep the Circular Garden Looking Clean
Defined edges are essential.
Grass will eventually attempt to grow toward the border, so trim around the outside of the pavers regularly.
Remove leaves and debris from the decorative pebbles using a blower on a low setting or by hand.
Pull occasional weeds before they become established.
Also prune the shrubs lightly when needed to maintain their compact shape.
Flower Maintenance Tips
Deadhead spent flowers throughout the growing season.
This improves the appearance of the garden and encourages many flowering plants to continue producing blooms.
Trim trailing flowers around the terracotta pot if they begin covering the pathway or decorative stones.
Replace annuals seasonally.
The permanent structure—the tree, shrubs, raised border, pebble ring, and lighting—can remain in place while flowers change throughout the year.
Choosing the Right Color Combination
Limiting the flower palette helps create a polished appearance.
This design relies mainly on:
- Pink
- Magenta
- Purple
- Lavender
- White
- Green
The restrained palette allows the different flower varieties to work together rather than compete.
The white and charcoal pebbles provide contrast without adding another strong color.
The natural terracotta pot introduces a warm earthy tone that balances the bright flowers.
Tips for a Professional-Looking Result
Maintain consistent curves.
Uneven circles and irregular stone borders can make even expensive landscaping look unfinished.
Avoid overcrowding the plants.
A newly installed garden may initially appear slightly sparse, but healthy plants quickly fill the available space.
Use groups of the same flower instead of planting individual specimens randomly.
Hide irrigation tubing beneath mulch or soil where possible.
Finally, consider how the garden will look from inside the home as well as from the street.
A garden island positioned outside a major window can become part of the home's visual experience.
Seasonal Care
In spring, refresh the soil with compost and replace cool-season annuals.
During summer, monitor watering carefully and deadhead flowers regularly.
In fall, remove declining annuals and prune only plants that benefit from fall pruning.
Before winter, protect sensitive plants according to your local climate.
The solar lights and stonework can remain year-round.
Clean the solar panels occasionally so dirt does not reduce their charging performance.
Turn an Open Lawn Into a Designed Landscape Feature
This DIY circular flower bed with pebble mosaic and solar lights combines several simple landscaping techniques into one impressive front-yard feature.
The flowering tree provides height, compact shrubs create structure, colorful plants fill the middle layer, and the overturned terracotta pot gives the arrangement a playful focal point.
Around everything, the contrasting pebble mosaic and landscape lights create a clean finished border.
The project requires more preparation than planting a standard flower bed, but much of the structure can remain for years. Once the pavers, raised bed, stones, and tree are installed, seasonal updates can be as simple as replacing a few flowers and trimming existing plants.
For homeowners looking to turn an unused section of lawn into a polished garden centerpiece, this circular design offers a practical combination of landscaping, color, texture, and nighttime curb appeal.