What Is a Large-Pot Fairy Garden?
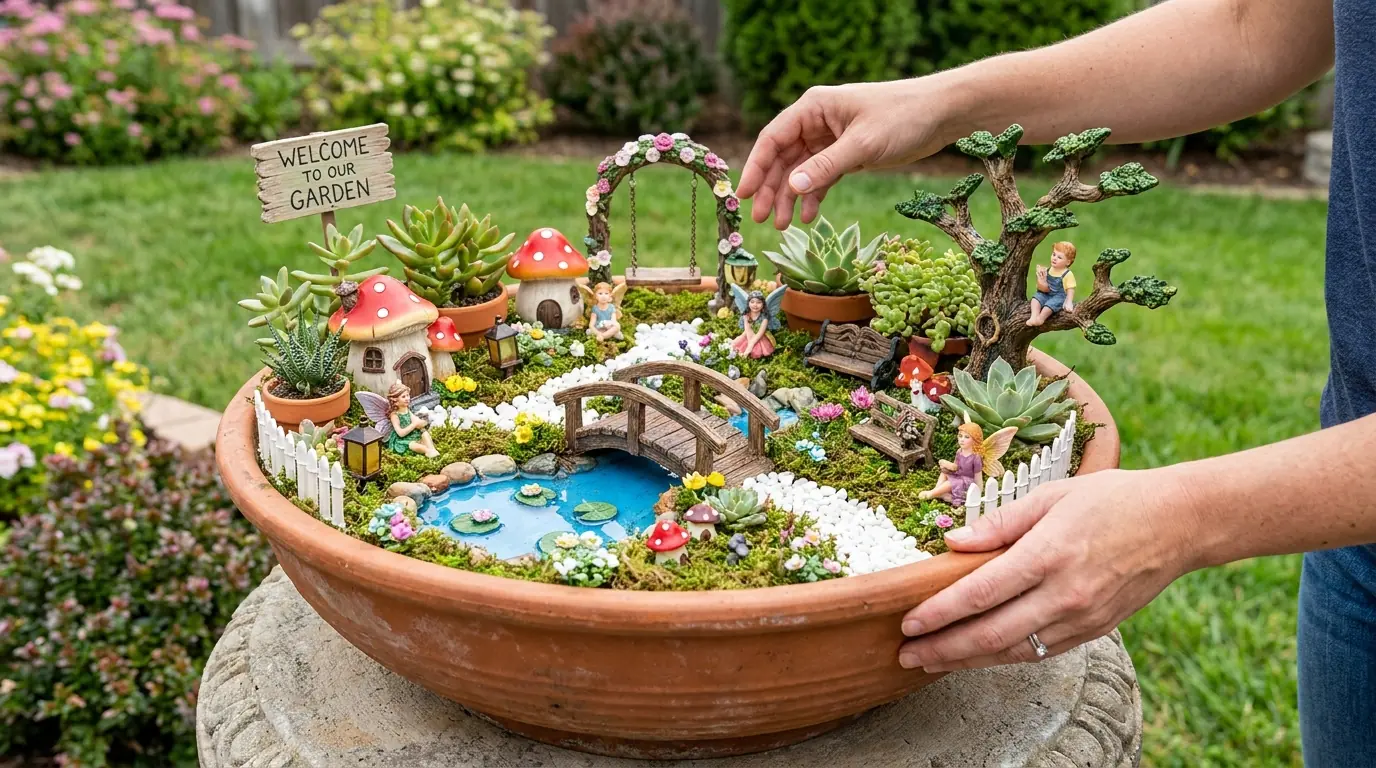
A large-pot fairy garden is a miniature landscape built inside a wide planter using real or artificial plants together with small decorative elements.
Unlike a simple container garden, the surface is divided into tiny “zones” that resemble a real yard or village.
In this design, the terracotta planter contains:
- A miniature blue pond
- A small wooden bridge
- White pebble pathways
- Red mushroom-shaped houses
- A miniature tree
- A hanging swing
- Tiny benches and lanterns
- Fairy figures
- Miniature fencing
- Small birdhouses
- Succulents and flowers
- Moss and natural stones
- A “Welcome to Our Garden” sign
All of these small elements create depth and encourage viewers to look closely at every part of the planter.
Materials and Tools Needed
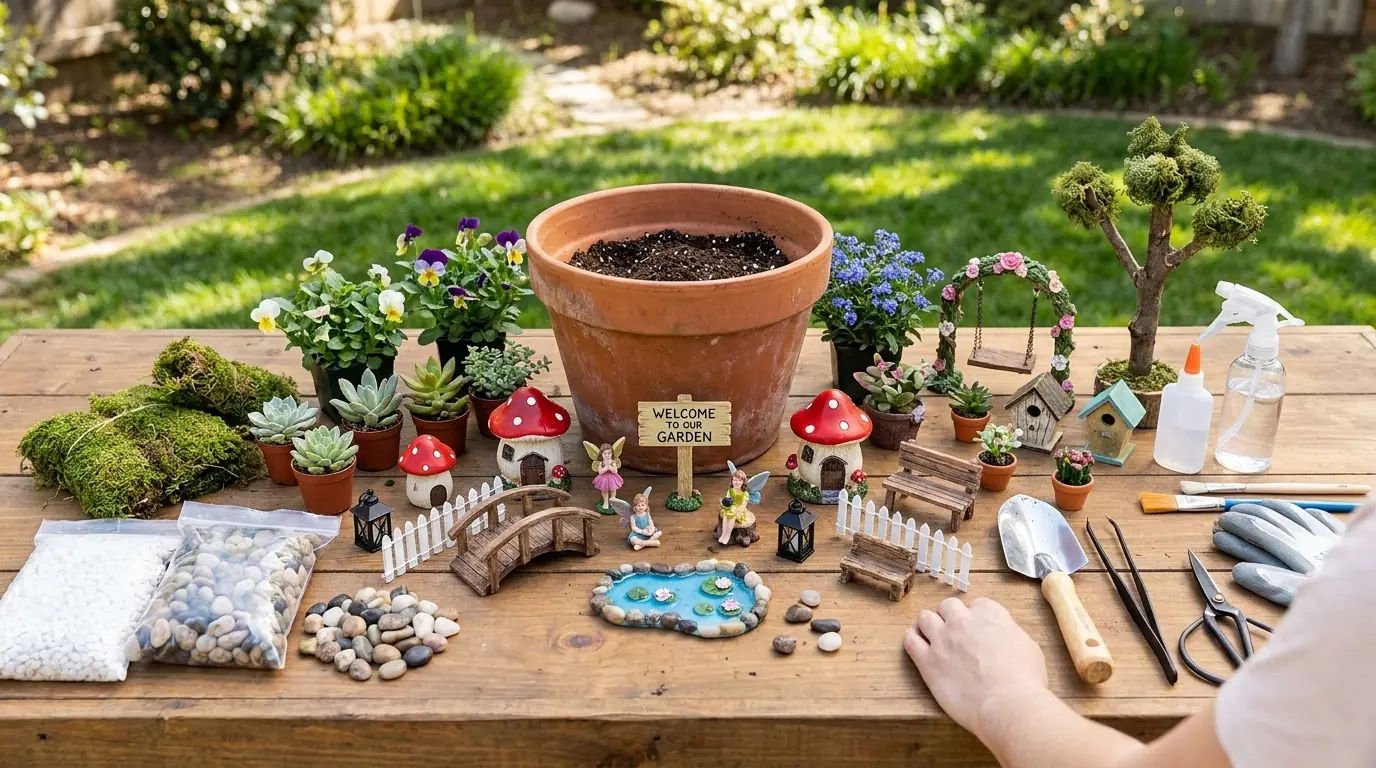
To create a fairy garden similar to the one shown, gather the following materials.
Main Materials
- One large wide terracotta planter
- Quality potting mix
- Small drainage stones
- Landscape fabric or mesh, optional
- Green moss
- Small succulents
- Compact flowering plants
- Miniature ground-cover plants
- White decorative gravel
- Natural river stones
- Small pebbles
Miniature Accessories
- Two or three miniature mushroom houses
- Miniature fairy figures
- Small wooden bridge
- Tiny garden bench
- Miniature lanterns
- White picket fence pieces
- Miniature birdhouse
- Small garden pots
- Tiny watering accessories
- Small wooden garden sign
- Miniature swing
- Decorative mushrooms
- Small animal figures, optional
For the Miniature Tree
- Small natural branch
- Preserved moss
- Faux miniature foliage
- Floral wire
- Strong craft adhesive
For the Pond
- Small shallow plastic or resin dish
- Blue decorative glass or resin
- Miniature water lilies
- Small stones
Tools
- Gardening gloves
- Hand trowel
- Small scoop
- Tweezers
- Pruning scissors
- Craft scissors
- Strong waterproof craft glue
- Hot glue gun, optional
- Small paintbrush
- Spray bottle
Step 1: Choose a Large Terracotta Pot
Start with a wide planter that provides plenty of horizontal space.
A bowl-shaped or oversized terracotta pot is ideal because the open surface allows you to build several miniature scenes without everything feeling crowded.
Make sure the planter has drainage holes.
If necessary, place a small piece of mesh over the hole to prevent soil from washing out while still allowing excess water to escape.
Step 2: Add the Soil Base
Fill the planter with high-quality potting soil.
Leave approximately 1 to 2 inches of space below the rim.
Firm the soil lightly but do not compact it heavily.
The surface should be stable enough to hold miniature accessories while remaining loose enough for plant roots.
Before planting anything, decide where the major features will go.
It helps to mentally divide the planter into several areas:
- Pond area
- Pathway
- House section
- Tree section
- Flower garden
- Seating area
Planning first prevents the finished arrangement from becoming overcrowded.
Step 3: Build the Miniature Pond
Create the pond slightly off-center rather than directly in the middle.
This makes the overall layout feel more natural.
Use a shallow plastic or resin container and partially bury it in the soil so the rim is almost level with the ground.
Fill it with blue decorative material to imitate water.
For a permanent low-maintenance design, blue resin, glass stones, or reflective craft material works well.
Add tiny floating lily pads or miniature water flowers.
Surround the pond with small natural stones.
Step 4: Add the Wooden Bridge
Position a small curved wooden bridge across one edge of the pond.
The bridge should connect naturally with the surrounding path.
Press both ends slightly into the soil so it looks grounded instead of simply sitting on the surface.
Add a few stones or moss around the bridge supports to blend it into the landscape.
Step 5: Create the White Stone Path
Use fine white gravel to create a winding path around the pond.
Begin near the front of the planter and allow the path to curve naturally toward the mushroom houses and other garden features.
Avoid making the path perfectly straight.
Gentle curves create the illusion of a larger landscape.
Use small natural rocks along portions of the edge if you want the path to look more defined.
Step 6: Add the Mushroom Houses
Place one larger mushroom house toward one side of the garden and a smaller house nearby.
Red roofs with white dots immediately create a classic fairy-garden appearance.
Partially bury the bottom edges in the soil.
This small detail makes the houses look like they belong in the landscape rather than simply being placed on top.
Add tiny plants, stones, or moss around their bases.
Step 7: Build the Miniature Tree
A miniature tree adds significant height and helps balance the wide planter.
Choose an interesting natural branch with several forks.
Push the base securely into the soil.
Attach small clusters of preserved moss or artificial greenery near the upper branches.
Keep some branches exposed so the tree retains its natural shape.
You can add a miniature figure sitting on a branch for an extra storytelling detail.
Make sure the tree is firmly anchored and cannot fall forward.
Step 8: Add a Tiny Swing
Create a miniature swing using a small wooden seat and thin twine.
Suspend it from a curved arch made from twigs or miniature branches.
Position the swing near the center-back portion of the garden.
Leave enough open space beneath it so the scene does not appear crowded.
A tiny flower or miniature decoration can be placed on the seat.
Step 9: Plant Succulents and Flowers
Now begin adding real plants.
Use compact varieties that will not quickly overpower the miniature accessories.
Succulents work especially well because they resemble tiny shrubs.
Small flowering plants add color and make the scene feel like a real garden.
Place taller plants toward the back or sides.
Use shorter plants near the pathways and pond.
Good options include:
- Sedum
- Echeveria
- Miniature ivy
- Alyssum
- Small violas
- Thyme
- Baby tears
Choose plants with similar watering requirements whenever possible.
Step 10: Add Moss
Tuck moss between the stones, around houses, beneath the tree, and beside the pathway.
Moss helps hide exposed soil and visually connects all the individual elements.
Do not cover the entire planter.
Leaving some small areas of soil and stone exposed creates a more realistic landscape.
Step 11: Install the Miniature Fence
Place sections of white picket fencing around the front or sides of the garden.
The fence can define a flower bed or create a small boundary around the pond.
Push the fence posts gently into the soil.
Keep the layout slightly irregular rather than creating a perfect circle.
Step 12: Add the Garden Sign
A handmade wooden sign gives the garden personality.
A message such as:
WELCOME TO OUR GARDEN
works especially well.
Position the sign toward the back where it remains visible above smaller plants.
You can decorate the sign with tiny flowers or mushrooms.
Step 13: Add Fairy Figures
Now introduce the characters.
Place fairy figures in different areas so the garden feels active.
For example:
- One fairy can sit near the pond.
- Another can stand near a bench.
- One can appear to walk along the path.
- A child figure can sit in the tree.
- Another character can stand near the birdhouse.
Avoid clustering every figure together.
Spread them throughout the planter so the viewer discovers new details gradually.
Step 14: Add Benches, Lanterns, and Birdhouses
Small architectural accessories help turn the garden into a believable miniature environment.
Place a tiny bench near the flowers.
Add one or two miniature lanterns beside the path.
Position a birdhouse near the tree or along the outer edge.
Small terracotta pots can also be scattered around the garden.
These details should support the scene rather than overwhelm it.
Step 15: Finish With Tiny Details
Once the main pieces are installed, fill small empty spaces with:
- Miniature mushrooms
- Tiny flowerpots
- Smooth stones
- Small animal figures
- Moss
- Succulent cuttings
- Miniature flowers
Take a moment to inspect the garden from several angles.
Make sure the pond, houses, tree, bridge, and main figures can still be clearly seen.
Tips for Making the Fairy Garden Look Realistic
Scale is extremely important.
Try to keep the houses, figures, furniture, fences, and accessories approximately proportional to one another.
Use layering to create depth.
Place taller features toward the back and smaller objects toward the front.
Also avoid perfect symmetry.
Real gardens contain natural variation, so slightly irregular paths and uneven plant groupings often look more convincing.
How to Water a Fairy Garden
Water slowly using a small watering can or narrow-spout bottle.
Avoid flooding the miniature pond or washing away the white gravel.
For moss, a spray bottle can be useful.
Check the soil before watering because different plants may have different moisture requirements.
If the garden contains mostly succulents, allow the soil to dry somewhat between waterings.
How to Maintain the Miniature Landscape
Trim plants regularly so they do not cover houses, paths, or figures.
Remove dead flowers and leaves.
After heavy rain, check whether gravel or small accessories have shifted.
Reposition miniature objects when necessary.
If the planter receives strong sunlight, inspect plastic or painted accessories for fading.
A clear outdoor-safe sealer can help protect some decorative pieces.
Seasonal Ideas
The same fairy garden can change throughout the year.
For spring, add colorful flowers and pastel decorations.
During summer, use bright blooms and lush greenery.
For fall, add miniature pumpkins, orange leaves, and tiny scarecrows.
In winter, artificial snow, miniature evergreen trees, and tiny holiday lights can transform the garden into a winter village.
Turn One Planter Into an Entire Tiny World
This DIY large-pot fairy garden combines gardening, miniatures, and storytelling in one creative project.
The terracotta planter provides the foundation, while the pond, bridge, mushroom houses, tree, flowers, pathways, fences, and fairy figures create an entire miniature landscape.
What makes this project especially fun is that it never has to be completely finished. New decorations can be added, plants can change with the seasons, and individual areas can be redesigned whenever inspiration strikes.
Whether displayed on a patio, beside a garden path, or in a backyard sitting area, this miniature fairy garden turns an ordinary planter into a tiny world filled with color, detail, and imagination.