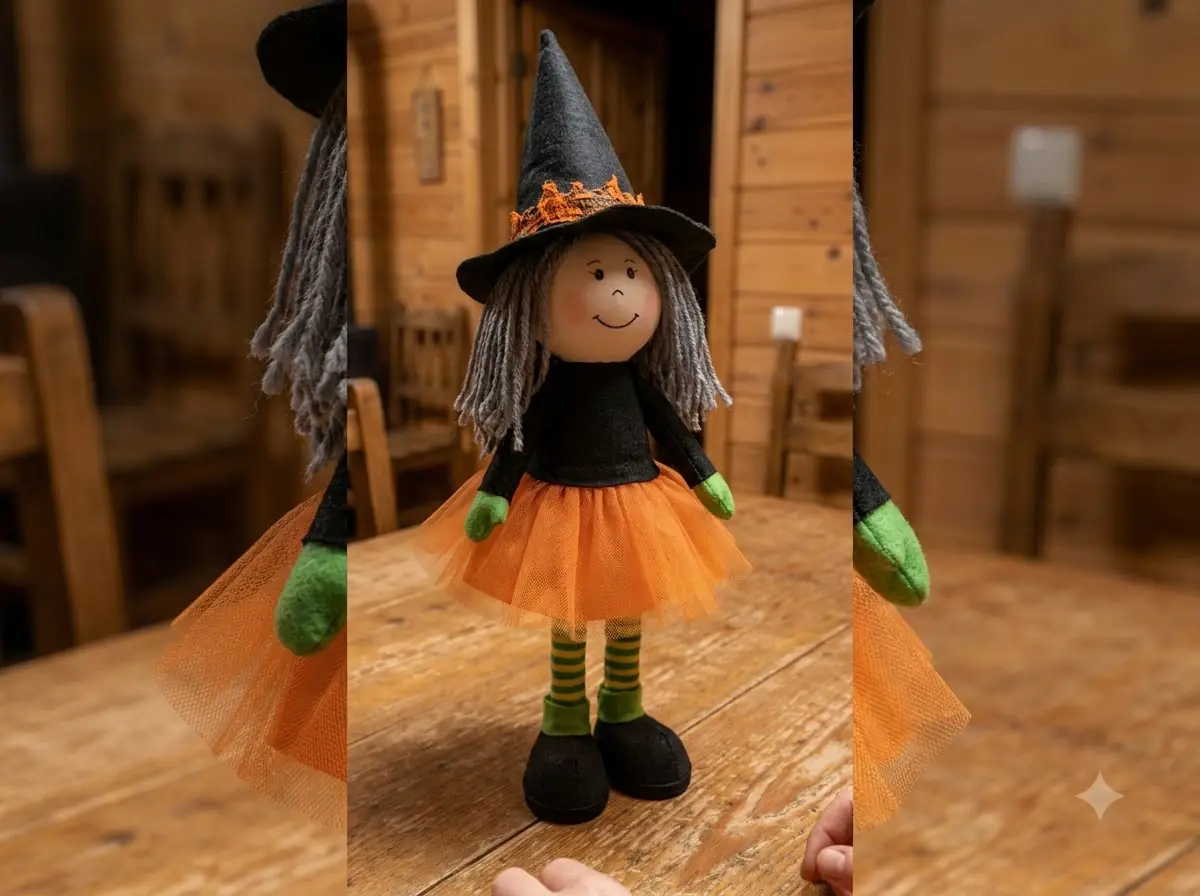
Halloween decorations do not always need to be scary. This DIY handmade witch doll is a great example of how a few inexpensive craft materials can be turned into a playful seasonal decoration with plenty of personality.
The finished witch has a large round head, long gray yarn hair, a tall pointed black hat with an orange textured finish near the brim, a bright orange tulle skirt, green-and-yellow striped legs, oversized black shoes, and small green hands. Her simple smiling face keeps the design friendly rather than frightening, making her suitable for a porch, entryway, fireplace display, Halloween table, or covered outdoor space.
What makes this project especially appealing is that most of the body is built from ordinary materials such as cardboard tubes, foam balls, fabric, felt, yarn, and hot glue. The result looks much more elaborate than the supplies suggest.
What Is This DIY Witch Doll?
This project is a freestanding decorative witch made primarily from lightweight craft materials.
The structure begins with two cardboard tubes used as the legs. They are wrapped in striped fabric to create the classic Halloween-style stockings. Large rounded black shoes are made separately and attached to the bottoms of the legs.
Above the legs is a simple black body covered by a full orange tulle skirt. The head is a large round foam ball, decorated with a very simple face.
Long gray yarn is attached around the sides of the head to create messy witch hair, and a tall pointed hat completes the design.
Small arms with green hands extend from the sides, while a bright orange balloon or decorative accessory can be added as a playful finishing detail.
Materials Needed
To make a witch similar to the one shown in the video, you will need:
- Two cardboard tubes
- One large foam ball for the head
- Two smaller foam balls or rounded pieces for the feet
- Green-and-yellow striped fabric or socks
- Black felt or black fabric
- Orange tulle
- Gray yarn
- Green felt or fabric for the hands
- Black craft foam or felt for the hat
- Orange mesh, tulle, paint, or decorative fabric for the hat
- Wooden skewers or thin dowels for internal support
- Cardboard
- Small buttons
- Black permanent marker
- Red or pink marker for the mouth
- Hot glue gun
- Glue sticks
- Scissors
- Craft knife
- Ruler
- Pencil
- Needle and thread, optional
- Decorative ribbon or Halloween embellishments, optional
- Small orange balloon, optional
Step 1: Build the Legs
Start with two cardboard tubes of the same length.
These form the structure of the witch's legs.
Cut two pieces of green-and-yellow striped fabric long enough to cover each tube. In the video, striped material is wrapped tightly around the cardboard to create colorful Halloween stockings.
Apply hot glue along one side of the tube.
Wrap the fabric around it smoothly, then secure the loose edge with another thin line of glue.
Repeat for the second leg.
Keep the stripe direction consistent so the legs look like a matching pair.
Step 2: Make the Oversized Black Shoes
The oversized shoes help the witch stand upright and give her a playful cartoon-like appearance.
Use small foam forms or lightweight rounded pieces as the basic shape.
Wrap each one with black felt or fabric.
Pull the material tightly around the sides and secure it underneath using hot glue.
Shape the front slightly so each shoe has a rounded toe.
Attach one striped leg securely into the top of each shoe.
Before continuing, stand both pieces upright and check that the legs are approximately the same height.
Step 3: Connect the Legs
Cut a small rectangular piece of sturdy cardboard.
Position it horizontally across the tops of the two leg tubes.
Glue both legs securely to this piece.
The cardboard connector creates a basic hip structure and keeps the legs at a consistent distance from one another.
Allow the glue to cool fully before lifting the assembly.
Step 4: Create the Body
The main body can be made from another cardboard tube, rolled cardboard, or a lightweight cylindrical form.
Cover the exterior with black fabric or felt.
Position the body vertically above the legs.
Attach it firmly to the cardboard hip support.
The body does not need much detail because most of it will eventually be hidden beneath the orange skirt and the witch's head.
Make sure the central structure stands straight before moving on.
Step 5: Make the Orange Tulle Skirt
The bright orange skirt is one of the most noticeable parts of the finished witch.
Cut multiple strips or sections of orange tulle.
Gather the material near one edge and bunch it into folds.
Attach the gathered sections around the witch's waist.
Continue working around the body until the skirt becomes full and fluffy.
Multiple overlapping layers create a better result than a single flat piece of fabric.
The finished skirt should spread outward around the body while still allowing the striped legs to remain visible underneath.
Trim uneven sections if necessary, but avoid making the skirt perfectly symmetrical. Slight variation makes it look more natural.
Step 6: Create the Arms and Green Hands
Make two small arms using thin dowels, rolled fabric, wire, or another lightweight support.
Cover the arms with black material if you want them to blend into the witch's clothing.
For the hands, cut small mitten-like shapes from green fabric or felt.
Glue the pieces together around the ends of the arms.
The hands do not need individual fingers.
Simple rounded green shapes match the handmade style of the doll.
Attach the arms to the sides of the body.
Angle them slightly outward rather than letting them hang perfectly straight.
Step 7: Prepare the Head
Use a large round foam ball as the head.
The head should be noticeably larger than the body, which gives the witch her cute, exaggerated proportions.
Leave the foam light-colored.
Draw two simple black circular eyes on the front.
Then add a small curved smile.
The face in the finished project is intentionally minimal. Avoid adding too many realistic details because the simple expression is part of its charm.
Attach the head securely to the top of the body.
A wooden skewer inserted through the body and into the foam ball can provide extra support.
Step 8: Add the Gray Yarn Hair
Cut many strands of gray yarn approximately the same length.
The hair should extend from the sides of the head down toward the witch's shoulders and skirt.
Gather several strands together and attach them along the sides and back of the foam head using hot glue.
Continue adding yarn until the hair looks thick.
Leave the front of the face mostly uncovered.
The finished hair should look slightly wild and uneven rather than perfectly styled.
This loose texture gives the witch much more character.
Step 9: Make the Witch Hat
Cut a large triangle from black felt, foam sheet, or flexible fabric.
Roll the triangle into a tall cone.
Overlap the edges slightly and secure them with hot glue.
The point should be long and slightly bent rather than perfectly straight.
For the brim, cut a wide circular or oval piece of black felt.
Create an opening in the center large enough to fit over the witch's head.
Glue the cone onto the brim.
In the video, the lower portion of the hat is decorated with orange material, giving it a burnt-orange or textured Halloween appearance.
You can recreate this with orange mesh, tulle, paint, or decorative fabric.
Allow some irregular texture around the hat so it does not look overly polished.
Step 10: Attach the Hat
Place the finished hat over the witch's head.
Position it so some gray hair remains visible on both sides.
Tilt the hat slightly for a more playful look.
Once you like the position, secure it with small amounts of hot glue.
Avoid using too much glue because the hat may need minor repositioning before it sets.
Step 11: Add Decorative Details
Small details make the witch feel complete.
In the finished version, bright buttons appear near the shoes and body.
You can add:
- Orange buttons
- Green buttons
- Small Halloween charms
- Ribbon
- Tiny pumpkins
- Artificial spiders
- A miniature broom
- An orange balloon
- Small bells
Keep the decorations simple enough that the main orange, black, green, and gray color palette remains clear.
Step 12: Check the Balance
Place the witch on a flat surface.
If she leans forward or backward, adjust the position of the shoes or add a little hidden weight inside them.
The large foam head and tall hat can make the upper portion relatively top-heavy.
A sturdy connection between the legs, shoes, body, and head is important if the decoration will be moved frequently.
Tips for a Better Finished Witch
Keep the proportions exaggerated.
The large head, long legs, oversized shoes, full skirt, and tall hat work together because none of them are intended to look realistic.
Use plenty of tulle.
A thin skirt will make the center structure visible, while several gathered layers create the full orange shape seen in the finished doll.
Do not make the yarn hair too neat.
A slightly tangled, uneven look gives the witch more personality.
Also keep the face simple.
Two dark eyes and a curved smile are enough.
Display Ideas
This handmade witch works particularly well as seasonal Halloween décor.
Place her:
- On a covered porch
- Beside the front door
- On an entryway table
- Near a fireplace
- On a Halloween party table
- In a craft room
- In a covered garden display
- Beside pumpkins and fall foliage
If displaying the witch outdoors, keep her protected from rain because cardboard, yarn, felt, and foam are not naturally weatherproof.
Storage and Care
Store the witch indoors after Halloween.
Keep her upright if possible to prevent the hat and skirt from becoming flattened.
If storage space is limited, loosely cover the doll with a large plastic bag and place her in a tall box.
Avoid crushing the tulle.
Dust can be removed with a soft brush or cool hair dryer on the lowest setting.
If any glued pieces loosen, simply reattach them with a small amount of hot glue.
A Fun Halloween Decoration Made From Everyday Materials
This DIY Halloween witch doll shows how simple supplies can become a surprisingly detailed seasonal decoration.
Cardboard tubes create the striped legs, black fabric forms the oversized shoes and body, orange tulle creates the dramatic skirt, gray yarn becomes wild witch hair, and a foam ball provides an easy base for the friendly face.
The tall black hat brings everything together.
The project is colorful, inexpensive, and highly customizable, making it a fun alternative to store-bought Halloween decorations. Whether displayed alone or surrounded by pumpkins and fall décor, this cheerful handmade witch adds personality without relying on anything overly scary.