What Is a DIY Lotus Flower Lamp?
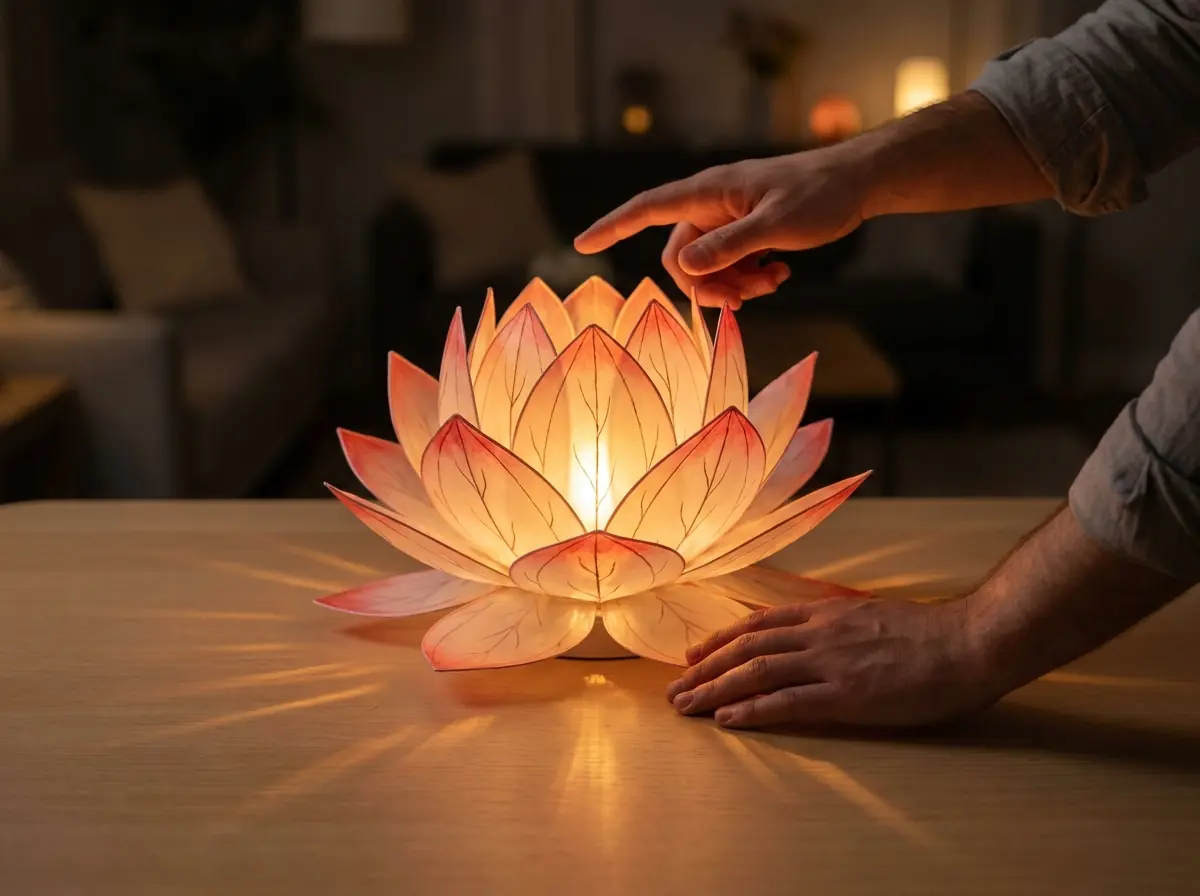
A DIY lotus flower lamp is a decorative handmade light designed to resemble the layered petals of a lotus blossom.
The version shown here uses transparent plastic cut into pointed petal shapes. Larger petals form the wide outer layer, while progressively smaller pieces create the upright inner layers.
The petals are arranged around a circular center made from part of a plastic bottle neck or another small ring-shaped base.
A small LED light sits inside the center of the flower.
Once illuminated, the clear plastic catches and diffuses the light while the tinted petal tips become much more visible. Fine decorative lines drawn along the petals add additional texture and make the flower feel more detailed.
Because most of the structure can be created from recycled plastic, this project is affordable and highly customizable.
Materials You'll Need
To create a lotus flower lamp similar to the one shown, gather the following supplies:
- Several clean clear plastic bottles
- A small battery-powered LED tea light or LED puck light
- Clear plastic bottle neck section or small plastic ring for the center
- Sharp scissors
- Craft knife
- Cutting mat
- Fine-tip permanent marker
- Red, coral, pink, or orange permanent marker or acrylic paint
- Small paintbrush
- Clear strong craft adhesive
- Hot glue gun with low-temperature glue, optional
- Ruler
- Pencil or washable marker for templates
- Cardstock for making petal templates
- Fine sandpaper, optional
- Tweezers or small pliers
- Protective gloves
Always use an LED light rather than a real candle. Plastic can melt or burn near an open flame or high heat source.
Step 1: Clean and Prepare the Plastic Bottles
Begin with clean, empty clear plastic bottles.
Remove the labels and adhesive residue, then wash the bottles thoroughly with dish soap and water. Allow them to dry completely.
Cut away the top and bottom portions so you are left with relatively flat sections of plastic from the bottle walls.
Depending on the shape of your bottles, gently flatten these sections beneath a book for a short period if needed.
Minor curves are not a problem. In fact, some natural curvature can help the finished petals look more organic.
Step 2: Make Lotus Petal Templates
The flower needs several different petal sizes.
Draw approximately three basic petal templates on cardstock:
- Large outer petals
- Medium middle petals
- Small inner petals
Each petal should have a rounded base that gradually narrows toward a pointed top.
The larger petals should be wider and more open, while the smaller petals can be slightly narrower and more upright.
Exact measurements are not essential. What matters most is maintaining fairly consistent proportions within each layer.
Cut the templates out and use them to trace petal shapes onto the clear plastic.
Step 3: Cut the Plastic Petals
Carefully cut each traced petal using sharp scissors.
For a full lotus shape, you may need approximately 20 to 30 petals depending on the flower's size and how densely you want the layers arranged.
Make extra pieces.
Having several spare petals allows you to choose the best-looking shapes during assembly.
After cutting, inspect every edge. Trim away sharp corners and uneven sections.
If necessary, lightly smooth rough edges with very fine sandpaper.
Step 4: Shape the Petals
A perfectly flat petal will not create the dimensional appearance seen in the finished flower.
Gently bend each piece by hand.
The large outer petals should curve outward and lie relatively low.
The middle petals should angle upward slightly.
The smallest center petals should stand more vertically around the light.
Because thin plastic naturally holds a slight curve, only gentle shaping may be necessary.
Avoid using excessive heat to shape the material. Heat can deform plastic unpredictably and may release unpleasant fumes.
Step 5: Add Color to the Petal Edges
The soft reddish-orange outline is one of the features that gives this DIY lotus lamp its distinctive appearance.
Use a red, coral, pink, or warm orange permanent marker to lightly tint the outer edge and pointed tip of each petal.
Keep most of the plastic transparent.
The color should be strongest near the tip and gradually become lighter toward the center.
You can also use a small amount of translucent acrylic paint applied with a fine brush.
Allow everything to dry fully before assembly.
Step 6: Draw Decorative Petal Veins
To make the petals look more realistic, add several thin curved lines running from the base toward the tip.
Do not make every line perfectly identical.
Natural variation helps the petals look handmade and organic.
Use a fine-tip red or brown marker so the lines remain delicate.
These details may look subtle when the lamp is turned off, but they become much more noticeable once the light shines through the plastic.
Step 7: Build the Circular Center
A short section cut from the threaded neck of a plastic bottle can work well as the central support.
Place it upright in the middle of your work surface.
This ring provides a convenient structure for attaching the petals and leaves an open center where the LED light can later be inserted.
Make sure the ring sits flat and does not wobble.
If necessary, glue it to a thin clear plastic disk for additional stability.
Step 8: Attach the First Layer of Large Petals
Begin with the largest petals.
Position them evenly around the central ring with the pointed ends facing outward.
Arrange approximately six to eight petals in a circular pattern.
Before gluing, place all of them loosely to check the spacing.
The petals should overlap slightly, just as petals overlap on a real flower.
Once you are satisfied with the layout, attach each petal securely near its base.
Allow the adhesive to set before adding additional layers.
Step 9: Add the Middle Layer
The second layer should sit inside and slightly above the first.
Use medium-sized petals and position them so that each petal falls between two petals in the previous layer.
This staggered arrangement creates fullness.
Angle these petals more upright than the outer layer.
Continue working evenly around the center rather than attaching several petals to only one side.
Periodically rotate the flower and inspect it from different angles.
Step 10: Build the Inner Lotus Bud
Now use the smallest petals.
These pieces should surround the center opening more closely and stand almost vertically.
Arrange them in overlapping circles until the center begins to resemble a partially opened lotus bud.
Leave enough room for your LED light.
Avoid packing the petals so tightly that the lamp cannot be removed or switched on.
The combination of broad outer petals and narrow upright inner petals gives the flower its realistic layered structure.
Step 11: Install the LED Light
Place a small battery-operated LED light inside the central opening.
A warm-white LED works especially well because it produces the amber-orange illumination shown in this style of lotus lamp.
Turn it on before permanently finishing the project.
Check whether the light spreads evenly through the petals.
If the bulb sits too low, place a small transparent platform beneath it.
If it sits too high, adjust the central support.
The LED should remain removable so you can replace the battery later.
Step 12: Make Final Adjustments
Switch off the light and inspect the flower carefully.
Adjust petals that are leaning too far inward or outward.
Look for obvious gaps in the arrangement.
The flower does not need perfect symmetry, but the overall shape should feel balanced when viewed from the front.
Remove glue strings or dried adhesive that may be visible through the transparent petals.
Once everything looks correct, switch the lamp on for the final reveal.
Tips for a Better-Looking Lotus Lamp
Use several layers of petals rather than trying to create the flower with one circle.
The layered construction is responsible for most of the depth and realism.
Keep the coloring light. Leaving most of each petal transparent allows the warm LED light to travel through the flower.
Vary petal angles gradually from the outside toward the center.
Outer petals should feel open and relaxed, while inner petals should become progressively more upright.
Also keep visible adhesive to a minimum. Because the petals are transparent, excessive glue can easily distract from the finished design.
Safety and Maintenance
This project should only be used with a cool-running battery-powered LED light.
Never place a real candle, tea light flame, incandescent bulb, or other high-temperature light source inside plastic petals.
To clean the finished lotus lamp, gently wipe the petals with a soft microfiber cloth.
Avoid harsh cleaning products that could remove the marker or painted details.
Store the lamp away from intense direct sunlight when it is not being used. Long-term UV exposure can discolor or weaken some types of clear plastic.
If a petal becomes loose, remove the LED light before making repairs.
Creative Ways to Customize the Design
Once you understand the basic construction, the lotus lamp can be adapted in many ways.
Try pale pink petal tips for a romantic look, deep red for a richer floral appearance, or light blue for a cooler decorative style.
You can also experiment with different LED colors.
Warm white creates a traditional candle-like effect, while soft pink or amber lighting can emphasize the flower's color.
For seasonal displays, several smaller lotus lights can be grouped together on a table.
You could even create different sizes and arrange them as a miniature illuminated pond-inspired centerpiece.
Turn Recycled Plastic Into a Beautiful Decorative Light
This DIY recycled plastic lotus flower lamp is a great example of how ordinary materials can become something unexpectedly decorative.
Clear plastic provides the structure, subtle color adds the floral character, and a simple LED transforms the entire project once the room becomes darker.
During the day, it works as a sculptural handmade flower. At night, the translucent petals illuminate from within, highlighting every layer, edge, and decorative line.
Whether you make it as recycled home décor, a handmade gift, or simply a creative weekend craft, this glowing lotus lamp offers an inexpensive way to turn discarded plastic into a piece worth displaying.