What Is a “Museum of Us” Shadow Box?
A “Museum of Us” is essentially a personalized miniature gallery.
Instead of hanging famous artwork on the walls, the gallery displays photographs that represent important people and moments. Wedding pictures, childhood photos, family portraits, vacations, graduations, anniversaries, or even old snapshots can all become part of the exhibit.
The shadow-box format is particularly useful because it provides enough depth to combine flat photographs with three-dimensional objects. Miniature figures placed along the bottom make the display feel like an actual museum room rather than a standard photo collage.
One of the most appealing aspects of this project is that there is no single correct layout. The number of photographs, frame styles, wallpaper pattern, miniature visitors, and box size can all be adjusted to fit the story you want to tell.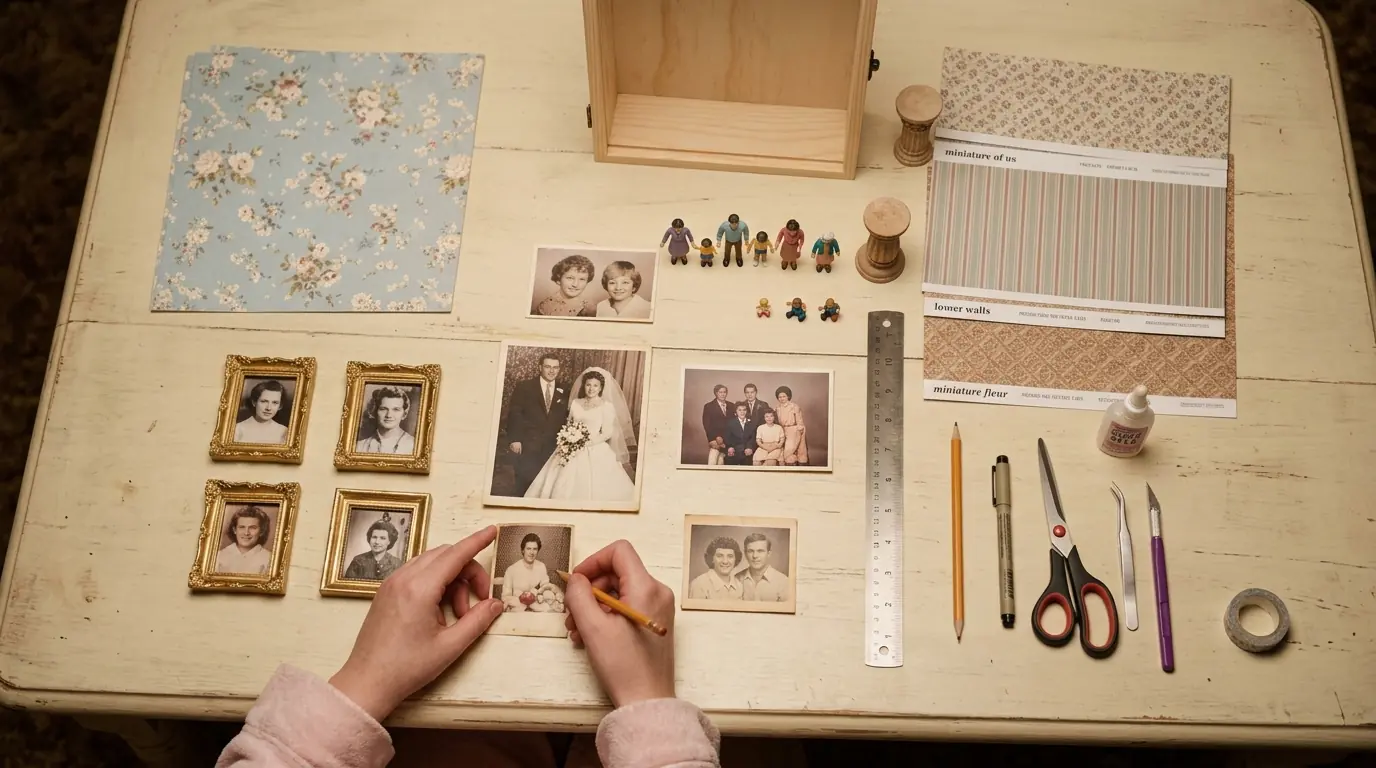
Materials and Tools You’ll Need
For a project similar to the example shown, gather:
- Wooden shadow box or deep wooden display frame with a glass or acrylic front
- Four small photographs
- Four miniature picture frames in coordinating styles
- Scrapbook paper, wallpaper-style craft paper, or printed decorative paper
- Striped or paneled paper for the lower wall
- Patterned paper for the miniature floor
- Miniature model people
- Small decorative architectural pieces, such as miniature pedestals or planters
- Cardstock or thin foam board
- Craft glue
- Strong clear-drying adhesive
- Double-sided tape or spray adhesive
- Craft knife
- Scissors
- Metal ruler
- Cutting mat
- Pencil
- Measuring tape or ruler
- Tweezers
- Fine-tip marker or paint pen
- Optional wood-burning tool or engraving pen
- Optional miniature molding or thin wood strips
For the miniature people, model railroad figures work particularly well because they are available in several scales and poses. Choose a size that looks proportional to the miniature picture frames and the depth of your box.
Step 1: Choose the Shadow Box
Start with a wooden shadow box that has enough interior depth for the miniature figures.
A box approximately 8 to 12 inches square works well for a small four-photo arrangement, although almost any size can be used.
A hinged shadow box is especially convenient because the front can still be opened after the project is finished. This makes it easier to repair loose pieces or replace photographs later.
If the wood is unfinished, you can leave it natural for a warm handmade appearance or lightly sand, stain, paint, or seal it before beginning the interior.
Make sure all finishes are completely dry before installing the decorative paper.
Step 2: Create the Miniature Gallery Wall
Measure the exact dimensions of the interior back panel.
Cut decorative scrapbook paper to fit this area. A subtle floral, damask, vintage wallpaper, or neutral pattern works particularly well because it resembles wallpaper without competing with the photographs.
Attach the paper smoothly using double-sided adhesive, spray adhesive, or a thin layer of craft glue.
Press outward from the center to eliminate bubbles and wrinkles.
For a more realistic gallery interior, divide the wall horizontally. Use patterned wallpaper on approximately the upper two-thirds and striped or paneled paper along the lower third.
A narrow strip of cardstock or miniature molding can be placed between the two sections to imitate chair rail molding.
Step 3: Add a Miniature Floor
Cut another piece of patterned paper approximately 1 to 2 inches deep and the width of the box.
Attach it horizontally along the bottom interior surface.
Tiny geometric patterns, faux tile, hardwood patterns, or small floral prints work well here.
The floor may seem like a minor detail, but it creates the visual perspective that makes the miniature figures appear to be standing inside a real room.
Step 4: Prepare the Photographs
Choose four photographs with clear subjects.
Because these photos will become very small, images with simple compositions usually work better than crowded group photographs.
Resize and print the pictures according to the opening of each miniature frame. Before applying glue, trim each photograph gradually until it sits comfortably behind the frame opening.
If possible, print the pictures on quality photo paper. A semi-gloss or matte finish often works better than highly reflective paper when the entire project will sit behind glass.
Secure each photograph behind its miniature frame using a tiny amount of adhesive or archival tape.
Step 5: Arrange the Gallery Before Gluing
Do not immediately attach the frames.
First, place all four frames against the decorated wall and experiment with different arrangements.
A balanced gallery layout usually works best when the frames are not identical. Combining rectangular and square frames or slightly different gold designs creates the collected appearance of a traditional museum wall.
Leave enough space between frames for the background pattern to remain visible.
Once you are happy with the arrangement, lightly mark each position with a pencil.
Step 6: Attach the Miniature Frames
Apply a small amount of strong craft adhesive to the back of each frame.
Press it firmly against the wall.
Check that each frame is level before the glue begins to set.
Because miniature metal or resin frames may be heavier than paper decorations, regular school glue may not provide enough support. A clear-drying craft adhesive designed for mixed materials is usually more reliable.
Allow the frames to cure fully before turning or moving the box.
Step 7: Build the Museum Visitors
Now add the detail that makes this project especially charming: the miniature visitors.
Arrange several tiny figures across the bottom of the gallery. Position most of them with their backs or sides facing outward so they appear to be looking at the photographs.
Vary their positions instead of placing everyone in a perfectly straight line.
For example:
- One person can stand directly beneath a photograph.
- A couple can stand together.
- One visitor can appear to walk toward another picture.
- Another figure can stand near a miniature pedestal or plant.
These small variations create the impression of a living museum scene.
Attach each figure securely by applying a tiny amount of adhesive to its feet.
Tweezers can make positioning much easier.
Step 8: Add Tiny Architectural Details
Additional miniature objects can make the scene more convincing.
Consider adding a small classical pedestal, sculpture, planter, bench, rope barrier, museum sign, or decorative column.
Keep these additions restrained. The photographs should remain the primary focus of the piece.
A few miniature details are usually more effective than filling every empty area.
Step 9: Personalize the Wooden Frame
The wooden border provides another opportunity to personalize the project.
Write or engrave a title such as:
Museum of Us
Other ideas include:
Our Story
The Family Gallery
Our Favorite Moments
The Story of Us
Memories Through the Years
Use a fine paint marker for the easiest option. For a more permanent handmade finish, lightly sketch the lettering in pencil and trace it with a wood-burning tool or engraving pen.
Practice on scrap wood first if you have never used one of these tools.
Step 10: Clean and Close the Display
Before closing the glass, inspect the interior carefully.
Remove stray glue strings, paper scraps, fingerprints, and dust. Clean the inside surface of the glass because it will be difficult to reach once everything is assembled.
Check that every frame and miniature figure is firmly attached.
Then close and secure the shadow box.
Tips for a More Professional Finish
The key to making a miniature display believable is scale consistency. Try to choose frames, figures, furniture, and architectural accessories from approximately the same miniature scale.
Use small-patterned wallpaper rather than large prints. A full-size floral design can make the miniature room look unrealistic, while tiny repeating patterns help maintain the illusion.
Also avoid using too much glue. Excess adhesive around tiny objects can become surprisingly visible through the front glass.
When cutting wallpaper and flooring, measure twice and cut once. Even a small gap can be noticeable in a miniature scene.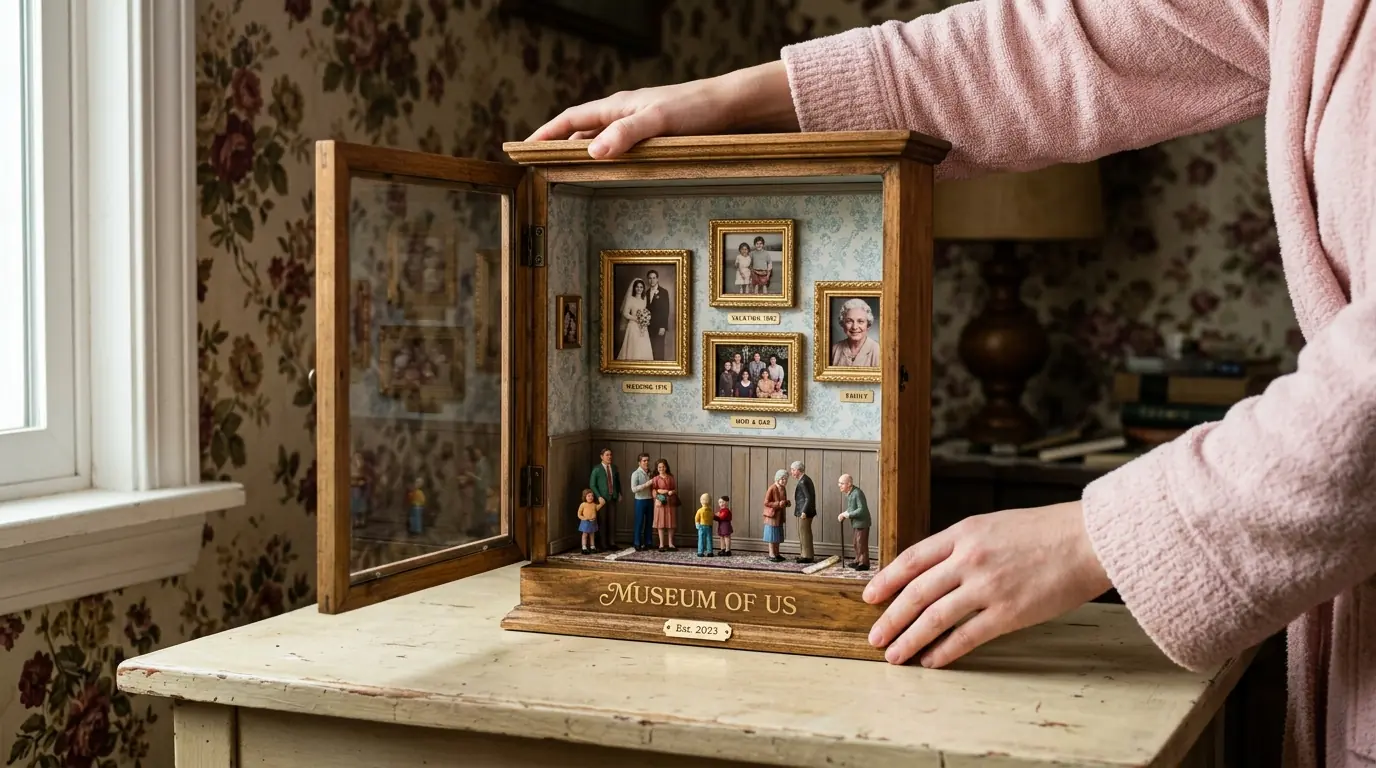
How to Protect and Maintain Your Memory Shadow Box
Keep the finished shadow box indoors and away from prolonged direct sunlight. UV exposure can fade photographs and decorative paper over time.
A closed display requires very little maintenance. Simply wipe the exterior glass with a microfiber cloth when dust accumulates.
If your shadow box has a hinged front, periodically inspect the miniature elements to make sure none have loosened.
For especially valuable or irreplaceable photographs, use copies rather than originals. The originals can remain safely stored while high-quality prints become part of the display.
A Small Project With a Very Personal Story
The charm of this DIY memory shadow box comes from combining two familiar ideas—a family photo display and a miniature room—into something much more personal.
From a distance, it looks like a beautifully framed decorative piece. Look closer, and you discover an entire miniature museum filled with photographs, visitors, wallpaper, flooring, and tiny architectural details.
Best of all, no two versions need to be the same. Every photograph and miniature detail can represent another part of your story, turning a simple wooden shadow box into a tiny “Museum of Us” that can be kept and displayed for years.