What Is a Vintage Suitcase Garden?
A vintage suitcase garden is a decorative planter created inside an old hard-sided or structured suitcase.
The suitcase is opened and displayed upright, with plants arranged inside the lower compartment and decorative elements attached or positioned against the inside lid. The result looks like a miniature garden scene built into a piece of old luggage.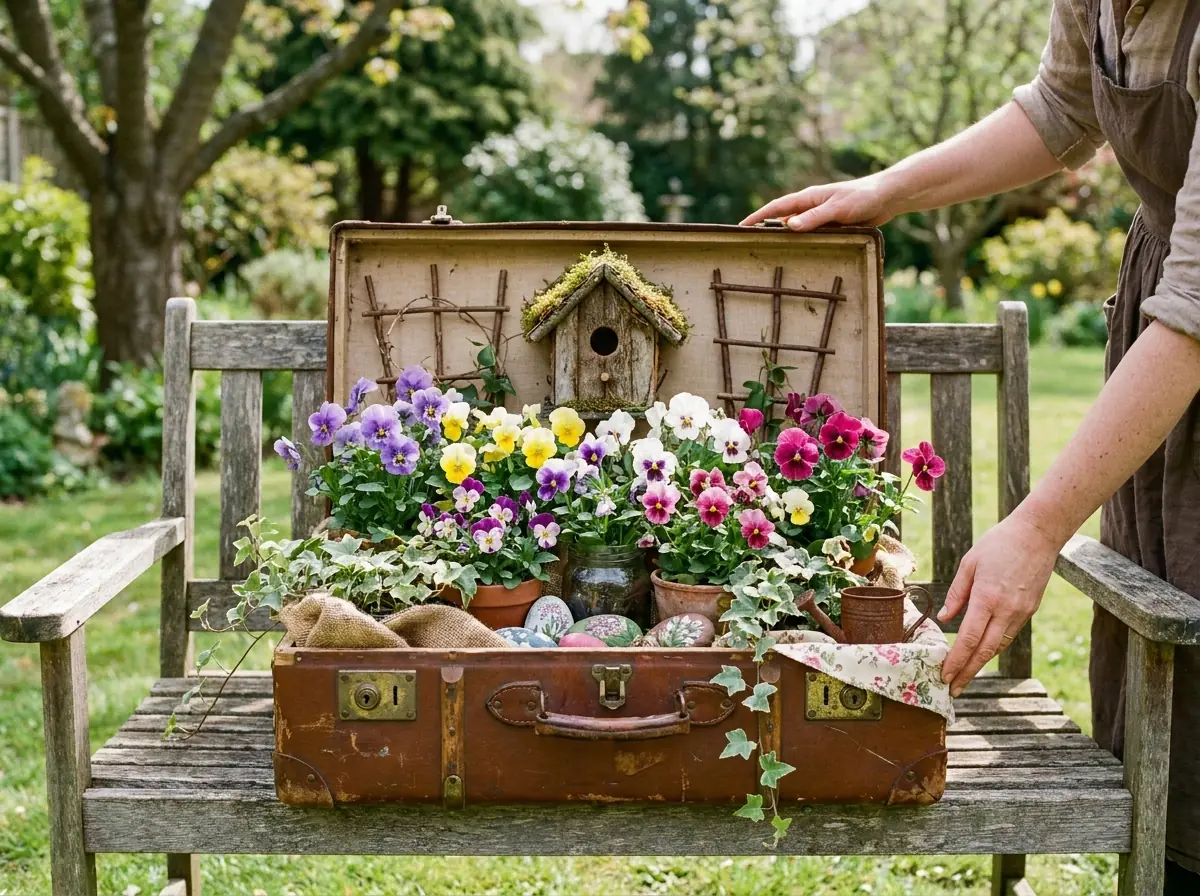
The example shown combines several garden elements:
- Colorful pansies and small flowering plants
- Trailing ivy spilling over the edges
- Flowers planted in glass jars and terracotta pots
- A rustic miniature birdhouse
- Twig trellises
- Small painted garden stones
- A miniature watering can
- Burlap and floral fabric accents
- Wooden blocks or crates used to create different heights
The layering is what makes the arrangement feel full and interesting.
Materials and Tools Needed
To build a suitcase planter similar to the one shown, gather:
- One old vintage suitcase
- Small plastic nursery pots or waterproof planting containers
- Potting soil
- Small flowering plants such as pansies, violas, petunias, or alyssum
- Trailing ivy or another cascading plant
- Small terracotta pots
- Mason jars or glass jars
- Miniature wooden birdhouse
- Small wooden crates, blocks, or risers
- Decorative burlap
- Floral-print fabric scraps
- Small twigs or thin branches
- Miniature watering can
- Decorative stones
- Acrylic paint or paint markers
- Floral foam, optional
- Plastic liner or heavy-duty plastic sheet
- Waterproof tray, optional
- Scissors
- Gardening gloves
- Hand trowel
- Pruning shears
- Strong outdoor-safe adhesive
- Staple gun, optional
- Small drill, optional
- Clear outdoor sealer
If the suitcase is antique or valuable, consider using removable containers instead of making permanent changes.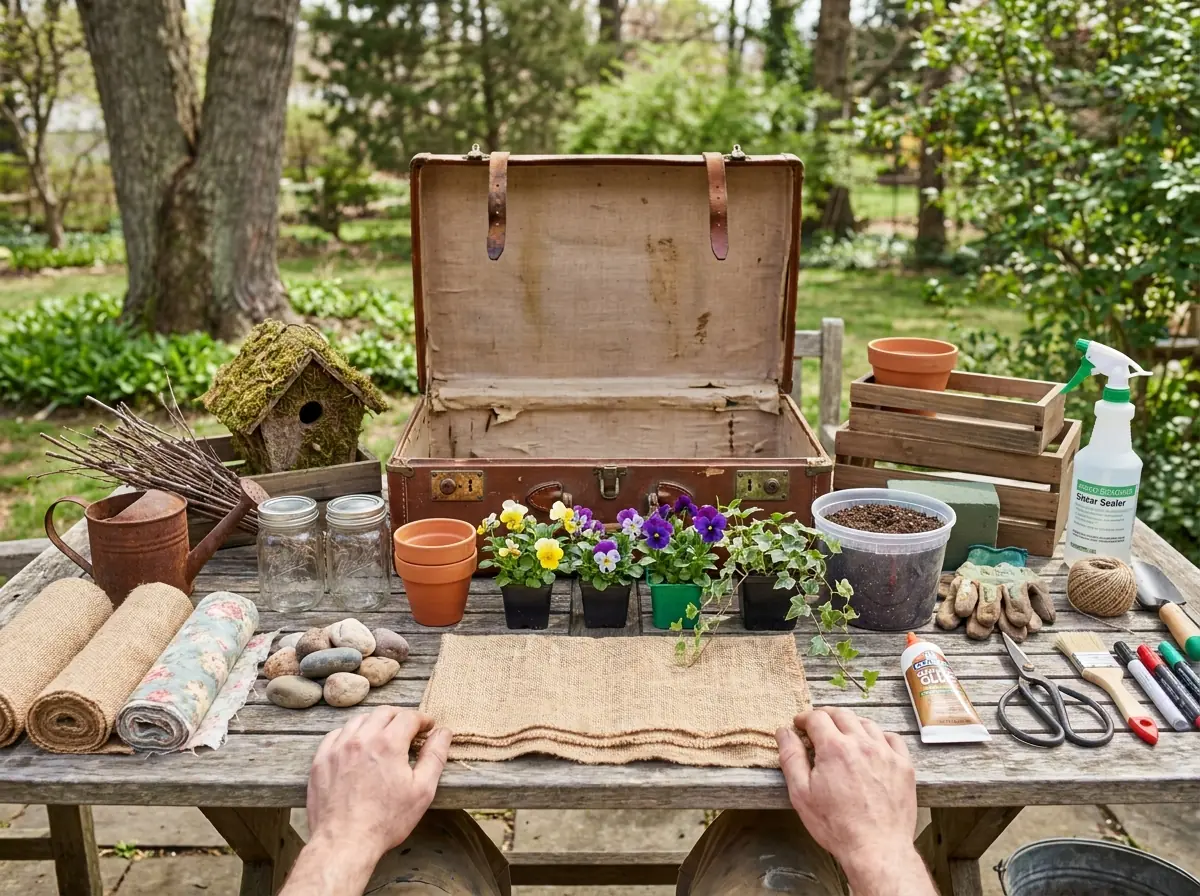
Step 1: Choose the Right Suitcase
Start with a suitcase that can remain open without collapsing.
A structured vintage suitcase with a leather, faux-leather, wood, or fiberboard body works best.
The worn appearance is part of the charm, so scratches, faded corners, old brass locks, and scuffed handles do not need to be repaired.
Inspect the hinges carefully.
Because the lid will be displayed upright, they need to be strong enough to support its weight.
If the hinges feel loose, reinforce them before adding plants or decorations.
Step 2: Clean the Suitcase
Remove dust, dirt, and loose interior fabric.
Use a soft brush or vacuum to clean the inside, then wipe the exterior gently with a slightly damp cloth.
Avoid soaking an old suitcase, especially if it contains cardboard, fiberboard, or untreated wood.
Allow it to dry completely before continuing.
If the interior smells musty, leave the suitcase open in a dry, ventilated place for a day or two.
Step 3: Protect the Interior From Moisture
This is one of the most important steps.
An old suitcase was not designed to hold wet soil.
Line the lower compartment with heavy-duty plastic or place a shallow waterproof tray inside.
Keep the liner slightly below the top edge so it remains hidden once the plants and fabric are added.
For the easiest maintenance, keep most plants inside individual nursery pots rather than filling the entire suitcase directly with soil.
This makes watering easier and prevents constant moisture from damaging the suitcase.
Step 4: Create Different Levels
A flat arrangement can look crowded and difficult to see.
Use small wooden crates, blocks, inverted pots, or sealed boxes to create several heights inside the suitcase.
Place taller elements toward the back.
For example, two jars of flowers can sit on a raised platform near the lid, while smaller terracotta pots remain closer to the front.
Cover visible supports with burlap, fabric, moss, or plants.
This creates the layered garden appearance seen in the finished design.
Step 5: Decorate the Inside Lid
The upright lid acts like the back wall of the garden.
Add a piece of burlap across most of the interior to create a rustic background.
Small strips of vintage floral fabric can be added around the edges for extra color.
Do not completely cover every part of the original suitcase lining. Leaving some worn material visible helps preserve the vintage character.
Attach lightweight decorations using removable clips, fabric adhesive, or small amounts of outdoor-safe glue.
Step 6: Make Simple Twig Trellises
Small handmade trellises add height without making the project look too formal.
Collect several straight twigs.
Arrange two vertical sticks with two or three shorter horizontal pieces across them.
Tie the joints with twine or secure them with small drops of glue.
Place one trellis behind the flowers on each side of the suitcase.
These can also support small climbing plants.
Step 7: Add the Birdhouse
Position a rustic miniature birdhouse toward the upper right or left side of the arrangement.
A weathered wood birdhouse with a moss-covered roof fits especially well with this style.
The birdhouse should be decorative rather than oversized.
Place it on a small wooden block or raised platform so it appears integrated into the miniature garden.
Make sure it is stable and will not fall onto the plants.
Step 8: Arrange the Main Flowers
Start with the largest flowering plants.
Pansies and violas are excellent choices because their blooms provide strong color without overwhelming the suitcase.
Place taller flowers near the back and slightly lower plants toward the front.
The arrangement does not need to be perfectly symmetrical.
In fact, varying the height and placement usually creates a more natural cottage-garden appearance.
Use several colors such as:
- Purple
- Yellow
- White
- Pink
- Magenta
Repeat some colors throughout the arrangement to create visual balance.
Step 9: Use Glass Jars as Planters
Clear glass jars are a charming addition.
Place small flowers inside jars using either:
- Small removable nursery pots
- Soil with a drainage layer
- Floral foam for temporary displays
Because glass jars usually do not have drainage holes, removable pots are often the safer option for live plants.
The dark soil visible through the glass adds another interesting texture to the display.
Step 10: Add Terracotta Pots
Place several small terracotta pots around the front and center.
Use them for flowers, herbs, or compact greenery.
The warm orange-brown color of terracotta works especially well with the brown suitcase.
Mix different pot sizes rather than using identical containers.
A slightly imperfect collection looks more authentic.
Step 11: Add Trailing Ivy
Trailing plants help connect all the individual containers.
Plant ivy or another cascading plant near the front corners and allow the stems to spill naturally over the suitcase edge.
You can also guide a few vines around the handle or toward the sides.
Do not arrange every vine perfectly.
A loose, slightly wild appearance makes the display feel more like a real garden.
Step 12: Add Small Garden Accessories
Once the plants are in place, add a few miniature details.
The example includes a small rusty watering can positioned near the front.
Other suitable accessories include:
- Miniature garden tools
- Tiny baskets
- Small signs
- Wooden labels
- Garden figurines
- Miniature benches
- Tiny seed packets
Avoid adding too many decorations.
Plants should remain the main feature.
Step 13: Make Painted Garden Stones
Small stones can be personalized with simple garden words or tiny floral designs.
Wash and dry smooth stones, then use acrylic paint or paint markers.
You might write:
- Garden
- Grow
- Bloom
- Welcome
- Love
- Herbs
- Flowers
Allow the paint to dry completely.
For outdoor use, apply a clear weather-resistant sealer.
Scatter the stones naturally among the flowerpots.
Step 14: Finish With Fabric and Burlap
Tuck pieces of burlap around the base of the plants to hide plastic pots, trays, and supports.
Add a small floral-print cloth along one edge for a softer vintage look.
Allow a little fabric to drape casually over the suitcase edge.
Avoid covering the original handle, locks, and leather details, because these are important parts of the vintage appearance.
Best Plants for a Suitcase Garden
Choose compact plants that can tolerate container growing.
Good options include:
- Pansies
- Violas
- Petunias
- Alyssum
- Ivy
- Creeping Jenny
- Small ferns
- Compact herbs
- Succulents
- Miniature roses
The correct plants depend on sunlight.
If the suitcase sits in a sunny location, choose sun-loving flowers.
For shaded porches or garden corners, use shade-tolerant plants such as ivy, ferns, and certain violas.
How to Water a Suitcase Garden
Watering requires extra care because the suitcase itself should stay as dry as possible.
Whenever possible, remove individual pots for watering.
Allow excess water to drain completely before returning them to the suitcase.
If the pots cannot be removed, water slowly and use small saucers underneath them.
Never allow standing water to collect inside the suitcase.
How to Protect the Suitcase Outdoors
A vintage suitcase garden is best kept in a covered outdoor area.
Rain, strong sunlight, and constant humidity can quickly damage old leather, fabric, cardboard, or wood.
A covered porch, gazebo, patio, or sheltered garden bench is ideal.
You can also apply an appropriate clear exterior sealer to some surfaces, but test it first because sealers may change the color of old leather or fabric.
During storms or extended periods of rain, move the entire arrangement indoors or into a protected space.
Seasonal Maintenance
Trim flowers regularly to encourage new growth.
Remove faded blooms and dead leaves.
Check trailing vines so they do not become tangled around the suitcase hardware.
Replace plants as seasons change.
In spring, use pansies and violas.
During summer, switch to petunias, herbs, or compact annuals.
In fall, add ornamental kale, small mums, miniature pumpkins, or dried seed heads.
This makes the suitcase garden easy to refresh throughout the year.
Tips for a More Professional Finished Look
Use the rule of three when arranging plants.
Three main flower groups placed at different heights often look more balanced than many identical pots.
Repeat colors.
If purple appears in one section, place another purple bloom somewhere else in the arrangement.
Combine textures.
Smooth glass jars, weathered leather, rough burlap, green foliage, terracotta, wood, and moss all contribute to the layered vintage aesthetic.
Most importantly, do not make the display too perfect.
A suitcase garden should feel like an old garden collection that developed naturally over time.
Turn an Old Suitcase Into a Garden Worth Displaying
This DIY vintage suitcase garden planter combines recycling, gardening, and nostalgic décor in one creative project.
The suitcase provides instant character, while colorful flowers, trailing ivy, old-fashioned pots, a miniature birdhouse, fabric, painted stones, and rustic accessories transform it into a miniature garden scene.
Instead of throwing away a damaged piece of luggage, you can give it an entirely new purpose.
Placed on a weathered garden bench, covered porch, or backyard table, the finished suitcase garden becomes more than a planter—it becomes a small piece of storytelling décor filled with flowers, texture, and vintage charm.