These Heart-Shaped Brookies combine two desserts in every bite: a rich, fudgy brownie base and chunks of buttery chocolate chip cookie dough baked right into the top. The brownie portion is intensely chocolatey, while the cookie pieces stay golden, soft, and slightly chewy.
What makes this version especially decadent is the brown butter brownie batter. Hot browned butter blooms the cocoa and melts the chopped chocolate, creating deeper chocolate flavor, while a little olive oil helps keep the centers moist. Chocolate chunks and chips scattered throughout give the finished hearts those irresistible pools of melted chocolate.
They're perfect for Valentine's Day, anniversaries, parties, or anytime you can't decide between brownies and chocolate chip cookies.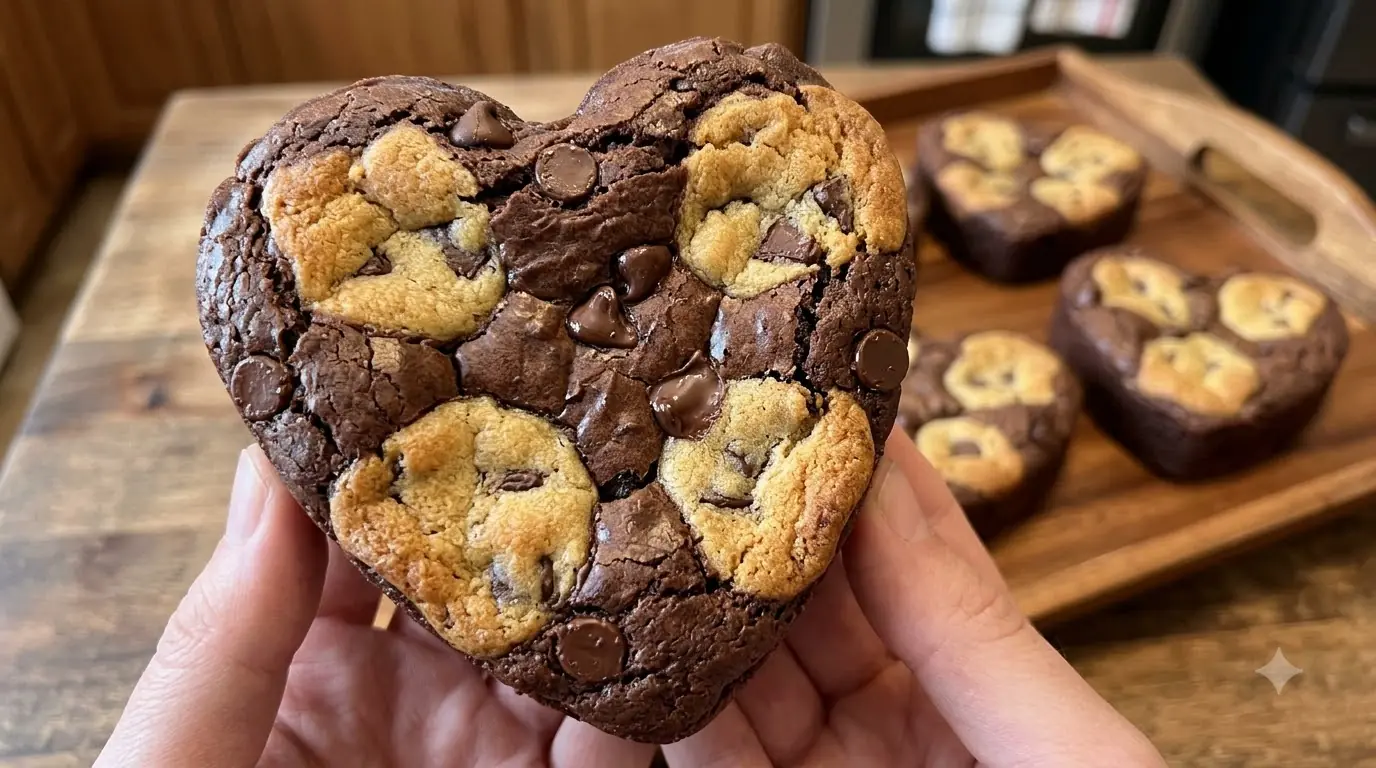
Ingredients
For the Chocolate Chip Cookie Dough
- 1¼ cups (150g) all-purpose flour
- ½ teaspoon baking soda
- ½ cup (113g) unsalted butter, melted and cooled
- ⅓ cup + 1 tablespoon (90g) packed light brown sugar
- ¼ cup + 1 tablespoon (60g) granulated sugar
- 1 large egg, room temperature
- 1 tablespoon vanilla bean paste
- ¾ cup (130g) semisweet chocolate chips or chunks
For the Brownie Batter
- ½ cup (50g) natural unsweetened cocoa powder
- 2 ounces (60g) semisweet or dark chocolate, finely chopped
- ½ cup (60g) all-purpose flour
- Pinch of fine salt
- 1 cup (227g) unsalted butter, browned and still hot
- 3 tablespoons (42g) olive oil
- ½ cup packed (110g) light brown sugar
- 1½ cups (190g) powdered sugar
- 3 large eggs, room temperature
- 1 tablespoon vanilla bean paste
- ½ cup (100g) semisweet chocolate chips
For Finishing
- Additional chocolate chunks or chips, optional
- Flaky sea salt, optional
How to Make Heart-Shaped Brookies
Preheat the oven to 350°F (175°C).
Lightly grease a heart-shaped muffin or brownie pan. For easy release, a flexible silicone heart mold works particularly well.
If using silicone molds, place them on a sturdy metal baking sheet before filling so they're easy to transfer to and from the oven.
Make the Chocolate Chip Cookie Dough
Step 1 – Combine the Dry Ingredients
In a medium bowl, whisk together:
- Flour
- Baking soda
Set aside.
Step 2 – Mix the Butter & Sugars
In another bowl, combine the melted and cooled butter, brown sugar, and granulated sugar.
Whisk until smooth and glossy.
Make sure the butter isn't piping hot before adding the egg.
Step 3 – Add the Egg & Vanilla
Whisk in the egg and vanilla bean paste until completely combined.
Step 4 – Add the Flour
Add the dry ingredients.
Using a rubber spatula, fold just until no major flour streaks remain.
Avoid overmixing.
Step 5 – Add the Chocolate
Fold in the chocolate chips or chunks.
The dough should be soft but scoopable.
Set it aside while you prepare the brownie batter.
Make the Brown Butter
Place 1 cup (227g) unsalted butter in a light-colored saucepan over medium heat.
Let it melt completely.
Continue cooking, swirling or stirring frequently. The butter will foam, then the milk solids at the bottom will begin turning golden brown.
Once you see deep golden-brown specks and smell a distinctly nutty aroma, immediately remove the pan from the heat.
Don't walk away during this stage—brown butter can go from beautifully toasted to burned quickly.
Make the Brownie Batter
Step 6 – Bloom the Cocoa & Chocolate
Place the cocoa powder and finely chopped chocolate in a large heatproof bowl.
Immediately pour the hot browned butter over them.
Let it sit for about 30 seconds, then whisk until the chocolate has melted and the mixture is smooth and glossy.
Whisk in the olive oil.
This hot-fat technique blooms the cocoa, intensifying its chocolate flavor.
Step 7 – Whisk the Eggs & Sugars
In a separate large bowl, combine:
- Eggs
- Brown sugar
- Powdered sugar
Whisk vigorously for approximately 2–3 minutes, until the mixture becomes lighter in color, slightly thicker, and glossy.
Whisk in the vanilla bean paste and salt.
Step 8 – Combine
Gradually fold the egg mixture into the chocolate mixture.
Continue folding gently until completely combined and glossy.
Step 9 – Add the Flour
Sift or sprinkle the flour over the brownie mixture.
Fold gently just until no dry flour remains.
Fold in the semisweet chocolate chips.
Don't continue mixing once everything is incorporated.
Assemble the Heart-Shaped Brookies
Spoon brownie batter into each prepared heart cavity, filling each approximately ½ to ⅔ full depending on the depth of your mold.
Don't fill them to the top because both components will expand during baking.
Take small irregular pieces of chocolate chip cookie dough and arrange them over the brownie batter.
Rather than covering the brownie completely, leave visible gaps of chocolate brownie batter between the cookie pieces.
This is what creates the striking brookie appearance.
Press the cookie dough only very lightly into the brownie batter.
Add a few extra chocolate chunks to the exposed areas if desired.
The Best Cookie-to-Brownie Pattern
For a look similar to the classic heart-shaped brookie, don't add one large cookie dough disc.
Instead, tear the cookie dough into 3–5 smaller pieces for each heart.
Arrange them irregularly across the surface.
As the brookies bake, the brownie expands around the cookie dough while the cookie pieces become golden, creating a dramatic mosaic of:
dark fudgy brownie + golden cookie + melted chocolate.
Bake
Bake at 350°F (175°C) for approximately 20–25 minutes.
Begin checking around 20 minutes, particularly if your heart molds are relatively small.
The brookies are ready when:
- the cookie portions are lightly golden,
- the brownie tops look set,
- the centers remain slightly soft,
- and a toothpick inserted specifically into a brownie section comes out with a few moist crumbs.
Avoid testing directly through a melted chocolate chip.
Most importantly, don't wait for a perfectly clean toothpick. That usually means the brownie portion has been overbaked.
Cool Before Removing
Let the brookies cool in the pan for approximately 15–20 minutes.
They're fragile while piping hot because the brownie centers and chocolate are still very soft.
Once they've firmed slightly, carefully remove them from the molds and transfer them to a wire rack.
For the fudgiest texture, let them cool completely before eating.
For gooey melted chocolate, serve them while they're still slightly warm.
Chef's Tips for the Best Brookies
- Don't skip browning the butter. It adds a deep toasted, almost caramel-like flavor to the brownie.
- Pour the brown butter over the cocoa while it's still hot.
- Finely chop the chocolate so it melts easily.
- Natural cocoa works especially well with this recipe.
- Let the cookie dough's melted butter cool before adding the egg.
- Don't overmix either batter once flour has been added.
- Use room-temperature eggs for smoother incorporation.
- Leave brownie batter visible between the cookie pieces. That's what creates the distinctive brookie look.
- Use irregular cookie pieces rather than perfectly shaped rounds.
- Don't overfill the heart molds.
- Add a few large chocolate chunks on top for visible melted chocolate pockets.
- Don't overbake—the brownie portion should stay fudgy.
- Allow the hearts to cool before trying to unmold them.
The Secret to Deep, Fudgy Brownie Flavor
There are two particularly useful techniques happening in this brownie batter.
First, the butter is browned.
As butter cooks, its milk solids toast and develop nutty, caramel-like flavors. Those flavors complement chocolate especially well.
Then that hot brown butter is poured directly over the cocoa powder and chopped chocolate.
Hot fat helps release and distribute cocoa's fat-soluble flavor compounds—a technique commonly called blooming the cocoa.
The combination creates a noticeably deeper chocolate flavor without simply adding more cocoa.
Why Use Both Brown Butter and Olive Oil?
Brown butter provides tremendous flavor, but during browning some of the butter's original water evaporates.
The small amount of olive oil adds liquid fat back to the formula and helps the brownie remain moist and fudgy after cooling.
Use a mild or fruity olive oil rather than an extremely bitter, peppery variety if you don't want a noticeable olive-oil flavor.
A neutral vegetable or avocado oil can also be used if preferred.
The Secret to the Brookie Mosaic
The temptation is to make two perfect layers: brownie underneath and cookie on top.
But that doesn't create the most dramatic brookie.
Instead, think of the cookie dough as a topping made of irregular islands.
Leave exposed brownie batter around every piece.
In the oven, the dark brownie rises between the golden cookie pieces, while chocolate chips melt across both components.
That's what creates the beautiful patchwork appearance in each heart.
How to Get Shiny Brownie Tops
Whisking the eggs with both sugars until the mixture becomes lighter, thicker, and glossy helps create the delicate surface crust associated with brownies.
Powdered sugar also dissolves readily into the egg mixture.
Give this stage a good 2–3 minutes of vigorous whisking before combining it with the chocolate mixture.
After that, handle the batter more gently.
Delicious Variations
Salted Caramel Brookies
Drizzle thick caramel over the cooled hearts and finish with flaky sea salt.
Oreo Brookies
Press broken Oreo pieces into the brownie batter alongside the cookie dough.
Peanut Butter Brookies
Replace some of the chocolate chips in the cookie dough with peanut butter chips.
Triple Chocolate
Use dark chocolate in the brownie, semisweet chips in the batter, and milk chocolate chunks on top.
Valentine's Brookies
Add pink, red, and white chocolate candies to the cookie portions before baking.
Espresso Brookies
Add 1 teaspoon instant espresso powder to the brownie batter to intensify the chocolate flavor.
Nutella Brookies
Add a small chilled dollop of Nutella to the center of each heart before topping with cookie dough.
What to Serve With Heart-Shaped Brookies
These are especially good with:
- Vanilla ice cream
- Fresh strawberries
- Raspberries
- Cold milk
- Hot coffee
- Espresso
- Whipped cream
- Warm chocolate sauce
- Salted caramel sauce
For dessert, warm one brookie briefly and serve it with vanilla ice cream and fresh strawberries.
Make-Ahead Tips
Both components can be prepared ahead.
The cookie dough can be covered and refrigerated overnight.
The brownie batter is best baked relatively soon after mixing, so for the easiest make-ahead option, bake the complete brookies ahead instead.
They remain wonderfully fudgy the following day.
You can also assemble individual portions in the molds, refrigerate briefly, and bake once you're ready.
Storage
Room Temperature
Store completely cooled brookies in an airtight container for up to 3–4 days.
Place parchment between layers to prevent sticking.
Refrigerator
They can be refrigerated for approximately 5 days, although refrigeration will make the brownie and chocolate firmer.
Bring them back to room temperature or warm briefly before serving.
Freezer
Wrap the individual hearts and freeze in an airtight container for up to 2 months.
Thaw at room temperature or overnight in the refrigerator.
How to Reheat
Microwave one brookie for approximately 8–12 seconds for a soft center and melty chocolate pockets.
For several brookies, warm them in a 300°F (150°C) oven for approximately 5–8 minutes.
Don't overheat them or you'll lose the fudgy brownie texture.
Notes
- Yield depends on the dimensions of your heart molds, but this recipe makes approximately 10–12 generously sized heart brookies in medium individual molds.
- If you have leftover cookie dough, bake it separately as cookies rather than overcrowding the brookies.
- If you have leftover brownie batter, bake it in a small parchment-lined pan or individual muffin cups.
- A silicone heart mold gives especially easy release, but placing it on a metal sheet pan provides stability.
- Chocolate chunks create larger visible pools of chocolate than standard chips.
- A small sprinkle of flaky sea salt after baking is excellent with the brown butter and dark chocolate.
- The ideal brookie should remain fudgy and dark around the edges of the golden cookie pieces, with irregular pools of melted chocolate clearly visible across the heart-shaped surface.