What Is a Broken Pot Fairy Garden?
A broken pot fairy garden is a miniature landscape created inside a damaged terracotta flowerpot.
The main planter becomes the outer structure, while broken pieces of pottery are arranged inside to divide the garden into several levels. Soil, moss, small plants, stones, miniature buildings, and decorative accessories are then added to create the impression of a tiny fantasy village.
The example shown uses a large terracotta pot with a substantial section missing from the front. Instead of repairing the opening, the broken pieces are placed horizontally and diagonally inside the planter.
This produces multiple planting terraces.
At the top, miniature cottage-style fairy houses sit among dense greenery. Below them, moss-covered areas, tiny stepping stones, succulents, and decorative pieces create additional layers. Near the front, a miniature water feature and fairy figure add another focal point.
The finished planter feels much larger and more detailed than its actual size because the different levels create depth.
Materials Needed for a DIY Broken Pot Fairy Garden
You do not need expensive supplies to build one. Many materials can come from an old planter and items already available around the yard.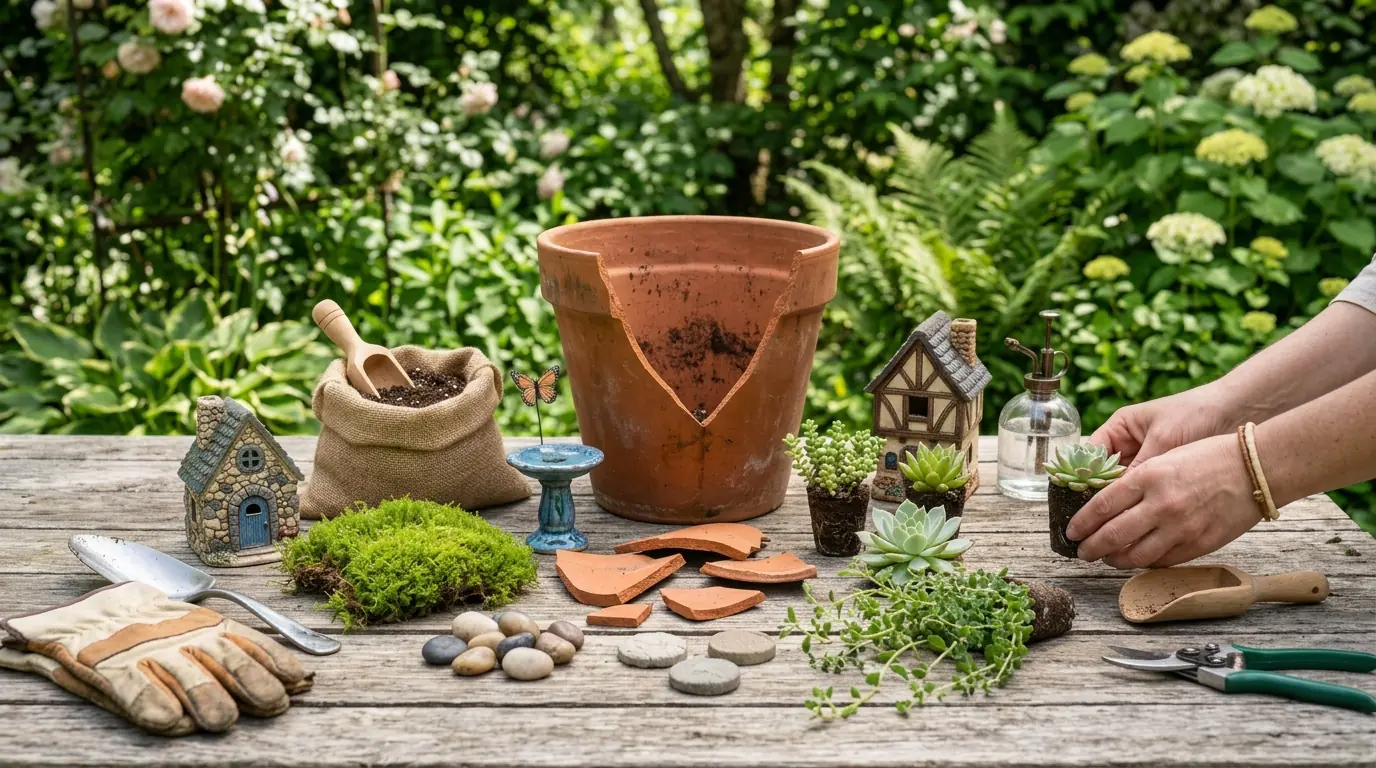
Basic Materials
- One large terracotta flowerpot
- Several broken terracotta pot pieces
- Potting soil
- Small gravel or drainage stones
- Landscape fabric or mesh, optional
- Moss
- Small succulents
- Miniature ground-cover plants
- Small ferns or compact greenery
- Pebbles or tiny flat stones
- Miniature fairy houses
- Miniature fairy or garden figures
- Small decorative accessories
- Miniature birdbath or pond
- Small branches or natural wood pieces
Useful Tools
- Gardening gloves
- Hand trowel
- Small scoop
- Pruning scissors
- Spray bottle
- Small paintbrush
- Pliers, if needed for adjusting broken pieces
- Protective eyewear when working with damaged pottery
Choose plants based on where the finished fairy garden will be displayed. Succulents are excellent for sunny, relatively dry areas, while mosses and some ferns generally prefer more moisture and protection from intense afternoon sun.
Step 1: Choose a Suitable Broken Terracotta Pot
Start with a large terracotta planter that still has enough structure to hold soil.
A pot with one large broken opening on the front or side is ideal. The opening provides a natural view into the miniature garden while leaving enough of the outer wall intact to support the planting material.
Avoid pots with cracks that extend around most of the base because they may collapse once filled with wet soil.
Wear gloves when handling broken terracotta. The edges can be surprisingly sharp.
If necessary, carefully remove unstable fragments before beginning the project.
Step 2: Create Proper Drainage
Even though this is primarily a decorative project, it is still a living container garden.
Good drainage is important.
Make sure the original drainage hole at the bottom remains open. Add a shallow layer of small gravel if desired, although a well-draining potting mix is usually more important than a thick gravel layer.
If the broken opening is very large, place a small piece of landscape fabric or plastic mesh behind sections where soil could easily spill out.
Do not completely seal the planter.
Water should still be able to escape naturally.
Step 3: Build the Terraced Structure
The layered construction is what gives a broken pot fairy garden its distinctive appearance.
Place one of the largest broken terracotta pieces inside the pot at an angle. Push its lower edge firmly into the soil so it remains stable.
Add more soil behind it.
Place another fragment slightly higher to create a second terrace.
Continue adding alternating layers of:
soil → pottery fragment → soil → pottery fragment
until you reach the upper portion of the container.
The pieces do not need to be perfectly symmetrical. In fact, slightly irregular levels usually look more natural.
Try to keep the broken edges facing inward or downward wherever possible so exposed sharp surfaces are minimized.
Step 4: Create a Miniature Pathway
A tiny path immediately makes the arrangement feel like a real landscape.
Use flat pebbles, small slices of wood, miniature stepping stones, or pieces of bark.
Begin near the lower front opening and allow the path to travel upward through the different levels toward the fairy houses.
Slight curves generally look more believable than perfectly straight lines.
Press each stepping stone gently into the soil so it looks integrated into the landscape rather than simply resting on top.
Small pieces of moss can be tucked around the path to soften the edges.
Step 5: Add the Miniature Houses
Place the largest fairy house near the upper back section of the planter.
This naturally creates a focal point.
A second, smaller house can be placed slightly lower or farther to one side to make the arrangement resemble a miniature village.
Avoid putting all decorations directly in the center.
A slightly asymmetrical layout usually creates better visual depth.
Press each house firmly into the soil or create a small level platform beneath it using stone or compacted soil.
If the planter will remain outdoors, lightweight accessories may need to be secured with an outdoor-safe adhesive or removable mounting material.
Step 6: Plant the Miniature Landscape
Now begin filling the terraces with plants.
Use the tallest greenery near the back and upper sections of the pot. Smaller plants should gradually move toward the front.
This creates forced perspective and makes the miniature garden appear deeper.
Succulents are particularly useful around the lower levels because their compact shapes resemble miniature shrubs.
Moss works well around pathways, buildings, and exposed soil.
Small creeping plants can also be encouraged to grow over the edges of the terracotta sections.
Leave some visible soil and pathways. Covering every inch with vegetation can make the scene feel crowded.
Step 7: Add a Tiny Water Feature
A miniature pond or birdbath makes an excellent focal point near the front.
You can use a small ceramic dish, miniature birdbath, shell, bottle cap, or shallow decorative bowl.
For the appearance of water without standing water, fill the container with blue glass stones or clear resin.
If using actual water, remember that tiny containers dry out very quickly and may also attract insects if neglected.
For a low-maintenance fairy garden, decorative faux water is generally easier.
Step 8: Add the Fairy and Small Details
Place one main fairy figure near the central portion of the garden.
Instead of filling the planter with many characters, use just a few carefully positioned pieces.
Other accessories might include:
- Miniature benches
- Tiny lanterns
- Small mushrooms
- Birdhouses
- Bridges
- Fences
- Garden tools
- Tiny flowerpots
- Miniature animals
- Small tables and chairs
Natural materials such as twigs, bark, acorns, and stones can also create convincing miniature structures without increasing the cost of the project.
How to Make a Fairy Garden Look More Realistic
Scale is one of the most important details.
Try to choose houses, figures, furniture, and accessories that are approximately the same scale. An oversized bench beside an extremely small house can immediately break the miniature illusion.
Layering also matters.
Think of the planter as a real landscape:
background → buildings → plants → paths → foreground details.
Avoid placing everything at the same height.
The broken terracotta pieces should help your eye move naturally from the bottom of the planter toward the miniature houses at the top.
Caring for an Outdoor Broken Pot Fairy Garden
Because the planter contains real plants, maintenance will depend largely on the varieties you choose.
Water slowly and carefully. The different terraces can cause water to travel unevenly through the container, so check the soil in several locations before watering again.
Succulent-heavy gardens should be allowed to dry somewhat between waterings.
Trim plants whenever they begin covering miniature houses or pathways.
Moss may require occasional misting in shaded environments.
Also inspect the decorative pieces after heavy rain or strong wind. Lightweight miniature accessories can shift or fall from the planter.
During freezing winters, consider moving the arrangement into a protected location. Terracotta absorbs moisture and can crack when repeated freezing and thawing occur.
Tips for Making the Project Last Longer
Use outdoor-rated materials whenever possible.
Miniature decorations designed specifically for fairy gardens are usually more weather-resistant than indoor dollhouse accessories.
If you paint any pottery pieces, apply an exterior clear sealer once the paint has completely dried.
Keep drainage holes open and avoid allowing the planter to sit continuously in standing water.
Most importantly, inspect the large pottery pieces periodically. As soil settles and roots develop, some fragments may shift slightly.
If a terrace becomes unstable, carefully remove nearby decorations and reset the pottery piece before continuing.
Turn a Broken Planter Into Something Worth Displaying
The best part of a DIY broken pot fairy garden is that the damage becomes part of the design.
Instead of hiding a cracked terracotta planter, you can use its broken sections to create miniature retaining walls, terraces, planting beds, and pathways. Add a few small houses, moss, succulents, stepping stones, and a fairy figure, and an ordinary damaged pot becomes an imaginative piece of garden décor.
It can evolve over time as the plants grow, and new miniature details can easily be added or rearranged.
Whether it sits on a backyard table, beneath a shady tree, or near the porch, a broken pot fairy garden adds a small, unexpected world to an otherwise ordinary corner of the yard.