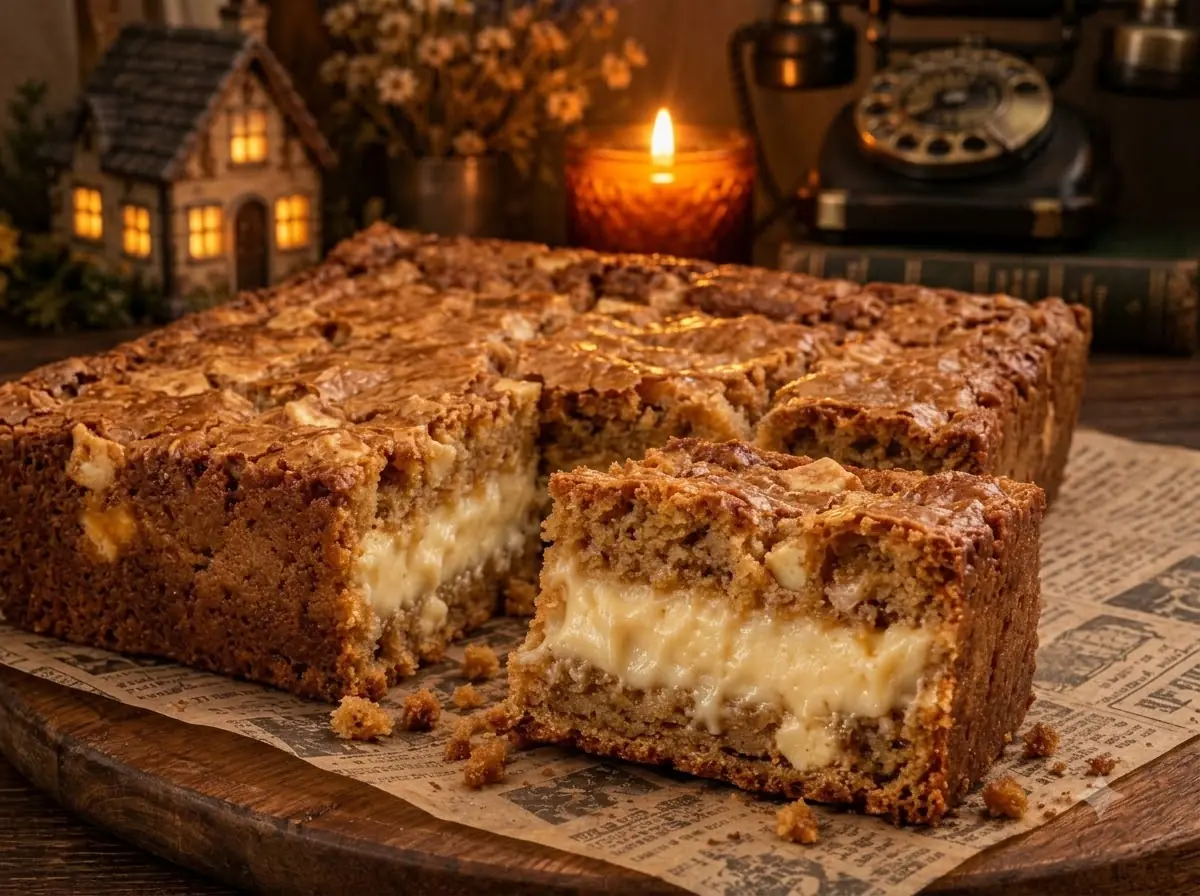
These Stuffed Brown Butter Blondies take everything people love about a classic blondie—deep caramel flavor, chewy edges, a soft center, and that thin crackly top—and hide a thick layer of creamy white fudge or white chocolate right in the middle.
The batter is intentionally simple. Browned butter brings toasted, nutty flavor, plenty of brown sugar gives the bars their signature caramelized sweetness and chew, and there is no cocoa powder to compete with the buttery blondie flavor. Thick pieces of white chocolate or white fudge are sandwiched between two layers of batter so that when the blondies are sliced, the center stays visibly creamy and indulgent.
They are especially good slightly warm, when the filling is soft and almost molten, but cooling them completely gives you cleaner bakery-style squares with a dense, fudgy center. If you like desserts that look simple until you cut into them, this is exactly that kind of recipe.
In This Recipe
- Why You Will Love These Stuffed Blondies
- Ingredients You’ll Need
- Ingredient Notes and Why They Matter
- Expert Tips for Best Results
- How to Make Stuffed Brown Butter Blondies
- The Secret to a Crackly Blondie Top
- The Secret to Keeping the Filling in the Center
- How to Know When Blondies Are Done
- Delicious Variations
- Frequently Asked Questions
- What to Serve With Stuffed Blondies
- Make-Ahead Tips
- Storage
- How to Reheat
- Recipe Card
Why You Will Love These Stuffed Blondies
Brown Butter Does Most of the Flavor Work
There are very few ingredients in this recipe, so every one matters.
Browning the butter transforms ordinary melted butter into something much deeper and more aromatic. The milk solids toast until they develop nutty, caramel-like flavors that work especially well with brown sugar.
That is what gives these blondies a richer flavor without needing a long ingredient list.
The Centers Stay Thick and Gooey
There is no baking powder or baking soda here, which is intentional.
These are not supposed to be cakey blondies. The structure comes primarily from the eggs and flour, while the high ratio of butter and brown sugar creates that dense, chewy, almost fudgy center.
There Is a Hidden Creamy Filling
Thick white chocolate or white fudge pieces are placed between two layers of blondie batter before baking.
They soften in the oven but remain concentrated in the center, creating a completely different texture from simply mixing white chocolate chips into the batter.
They Are Easy to Assemble
There is no piping, frosting, layering baked cakes, or special equipment involved.
Make one batter, spread half into the pan, add the filling, cover it with the remaining batter, and bake.
They Have That Bakery-Style Crackly Top
A shiny, deeply golden surface with little cracks is one of the best parts of a great blondie.
Mixing the warm brown butter thoroughly with the brown sugar and eggs helps create that characteristic surface as the bars bake.
Ingredients
For the Brown Butter Blondies
- 1 cup (226g) unsalted butter
- 1¾ cups (about 350g) packed light brown sugar
- 2 large eggs, preferably room temperature
- 2 cups (240g) all-purpose flour
- ½ teaspoon fine salt
For the Filling
- About 8 ounces (225g) thick white chocolate blocks, white chocolate bar pieces, or firm white fudge squares
Optional Finish
- Flaky sea salt
- Extra melted white chocolate for drizzling
Ingredient Notes and Why They Matter
Butter
Use unsalted butter so you have better control over the salt level.
A full cup may sound generous, but remember that some water evaporates during browning. What remains is concentrated butterfat and toasted milk solids, which contribute both flavor and the dense blondie texture.
Brown Sugar
Brown sugar is doing several jobs here.
It provides sweetness, moisture, caramel flavor, and chew.
Light brown sugar gives the bars a classic butterscotch profile. Dark brown sugar can be used for an even deeper molasses flavor, but it will make the blondies darker and slightly softer.
Eggs
Two eggs provide enough structure to hold the bars together without pushing them into cakey territory.
Room-temperature eggs also incorporate more smoothly into the warm butter and sugar mixture.
All-Purpose Flour
Two cups of flour give the blondies enough body to hold the creamy filling while remaining dense.
Measure flour carefully. Scooping it directly from the bag can compact it and lead to dry blondies.
For best results, weigh 240g.
White Chocolate or White Fudge
The filling needs to be relatively thick and firm before baking.
Thin white chocolate chips can simply melt into the batter, while larger blocks produce a much more dramatic center.
A firm homemade or store-bought white fudge can also work beautifully.
Expert Tips for the Best Stuffed Blondies
Brown the Butter Deeply Enough
Do not stop as soon as the butter becomes yellow.
Once it melts, it will foam and sizzle. Continue cooking until the milk solids at the bottom of the pan become amber-brown and the butter develops a strong toasted, nutty aroma.
Remove it from the heat immediately once it reaches that point.
Those little browned bits are full of flavor, so pour all of them into the mixing bowl.
Let the Butter Cool Slightly
You want the brown butter warm enough to mix easily with the sugar but not so hot that it cooks the eggs.
About 10 minutes of cooling is usually enough.
Mix the Sugar Thoroughly
Brown sugar does not completely dissolve in butter, but whisking it well helps distribute it evenly.
That contributes to both the chewy texture and the crackly surface.
Mix the Eggs Well Before Adding Flour
Once the eggs go in, whisk vigorously until the mixture looks thicker and smoother.
This helps create better structure and encourages the glossy top.
Stop Mixing Once the Flour Is Incorporated
Overmixing blondie batter can make the bars tough.
Fold only until no dry flour remains.
Keep the Filling Away From the Sides
Leave about a ½-inch border around the white chocolate or fudge.
This lets the top and bottom blondie layers meet around the edges, effectively sealing the creamy filling inside.
Don't Overbake
This is the biggest mistake with blondies.
The middle should still look slightly soft when the pan comes out of the oven.
The bars continue setting from residual heat as they cool.
How to Make Stuffed Brown Butter Blondies
Step 1 – Prepare the Pan and Oven
Preheat the oven to 350°F (175°C).
Line an 8 x 8-inch square metal baking pan with parchment paper, leaving enough overhang on two sides to lift the blondies out later.
Lightly grease any exposed portions of the pan.
Using the same pan from assembly through baking keeps the layers intact and prevents unnecessary handling.
Step 2 – Brown the Butter
Place the butter in a light-colored saucepan over medium heat.
Let it melt completely.
Continue cooking, stirring or swirling frequently. The butter will foam as the water evaporates.
After several minutes, golden specks will begin appearing at the bottom.
Keep cooking until those milk solids turn a deep amber-brown and the butter smells nutty and caramelized.
Immediately pour the brown butter—including all the toasted milk solids—into a large mixing bowl.
Let it cool for about 10 minutes.
Step 3 – Add the Brown Sugar
Add the packed brown sugar to the warm browned butter.
Whisk until evenly combined.
The mixture should look glossy, thick, and slightly grainy.
Step 4 – Add the Eggs
Add the eggs.
Whisk vigorously for about 45–60 seconds, until the mixture becomes smoother, thicker, and more cohesive.
This step helps give the blondies their shiny, lightly crackled top.
Step 5 – Add the Flour and Salt
Add the flour and salt.
Switch to a rubber spatula and fold gently.
At first the batter may look slightly loose, but it will quickly become thick.
Stop mixing as soon as no visible streaks of flour remain.
The finished blondie batter should be thick enough to spread rather than pour.
How to Assemble the Stuffed Blondies
Step 6 – Add the First Blondie Layer
Scoop about half of the batter into the parchment-lined pan.
Because the batter is thick, use an offset spatula or the back of a spoon to spread it evenly into all four corners.
Aim for an even layer so the white chocolate filling stays level.
Step 7 – Add the White Chocolate or Fudge
Arrange several thick pieces of white chocolate or white fudge across the center.
Keep them close enough together that most slices will contain some filling, but leave approximately ½ inch around the outer edge.
For a very dramatic center, use flat blocks rather than small chips.
Do not press them all the way through the bottom batter.
Step 8 – Add the Remaining Batter
Spoon the remaining blondie batter over the filling.
It is easiest to add several small portions rather than one large mound.
Gently spread them together until the white chocolate or fudge is completely covered.
Smooth the surface without pressing too firmly.
How to Bake Stuffed Blondies
Step 9 – Bake
Place the same square pan directly into the preheated oven.
Bake at 350°F (175°C) for approximately 28–35 minutes.
Start checking around 28 minutes.
The exact timing depends on your pan, oven, and the thickness of the filling.
The top should be:
- deeply golden,
- dry and set rather than wet,
- lightly crackled,
- and slightly puffed around the edges.
The middle can still look softer than the perimeter.
Step 10 – Check for Doneness
Insert a toothpick into the blondie portion rather than directly through a piece of white chocolate.
The toothpick should come out with moist crumbs.
It should not have wet raw batter attached.
Do not wait for a perfectly clean toothpick. That usually means the bars have gone past the ideal gooey stage.
Step 11 – Cool
Remove the pan from the oven and place it on a wire rack.
Let the blondies cool in the same pan for at least 45–60 minutes.
They will continue setting significantly during this time.
For very neat slices, allow them to cool completely for about 2 hours.
Step 12 – Slice and Reveal the Filling
Use the parchment overhang to lift the blondie slab from the pan.
Cut into squares with a sharp knife.
When one piece is pulled apart, the middle should reveal a distinct creamy white chocolate or fudge center surrounded by dense golden blondie.
For a softer, gooier reveal, serve the bars just slightly warm.
The Secret to a Deep Golden Crackly Top
That thin, glossy surface comes from the relationship between the sugar, fat, and eggs.
Mixing brown sugar thoroughly into warm browned butter begins dissolving some of the sugar crystals. Whisking the eggs into that mixture then creates a more cohesive batter.
During baking, sugar migrates toward the surface and helps form the thin crust that eventually cracks as the blondies cool.
This is also why you should mix the butter, sugar, and eggs thoroughly before the flour goes in.
Once flour is added, you want to mix as little as possible.
The Secret to Keeping the Filling in the Center
The most reliable method is to create a complete blondie shell around the filling.
Start with a solid bottom layer of batter.
Then position the white chocolate or fudge away from the edges.
Finally, cover it completely with the remaining batter.
During baking, the outer blondie layers connect around the sides while the filling softens inside.
If the filling touches the pan edges, melted white chocolate can escape or caramelize against the pan instead of remaining as a clean internal layer.
How to Know When Blondies Are Done
Blondies are easy to overbake because people often wait until the center looks completely firm.
Instead, look for a combination of signs.
The edges should be golden and clearly set.
The surface should have a deep golden color with visible cracks.
The center should no longer look wet, but it may still appear softer than the edges.
A toothpick inserted into an area without filling should show moist crumbs.
The blondies will firm dramatically as they cool, so remove them before they look completely finished.
Delicious Variations
Salted White Chocolate
Finish the blondies with a small amount of flaky sea salt.
The salt cuts through the sweetness of the white chocolate and highlights the caramelized brown butter flavor.
Biscoff Stuffed Blondies
Replace the white chocolate blocks with chilled pieces of Biscoff spread or a layer of firm cookie butter filling.
Nutella Stuffed Blondies
Freeze spoonfuls of Nutella until firm, then arrange them between the blondie layers.
Caramel Stuffed Blondies
Use thick soft caramel pieces or a firm caramel filling.
Avoid thin caramel sauce, which can disappear into the batter.
Oreo White Chocolate Blondies
Add roughly chopped Oreo cookies to the blondie batter and keep the white chocolate filling in the center.
Raspberry White Chocolate
Add a very thin layer of thick raspberry preserves alongside the white chocolate.
The acidity of the berries balances the sweet filling beautifully.
Dark Chocolate Center
Swap the white chocolate for thick pieces of dark chocolate for a less-sweet version.
Frequently Asked Questions
Why Brown the Butter?
Browning butter toasts its milk solids, creating flavors that regular melted butter does not have.
The result is nutty, caramelized, and slightly toffee-like, which is especially noticeable in blondies because there is no cocoa powder masking the butter flavor.
Can I Use Regular Melted Butter?
Yes, but the flavor will be noticeably simpler.
If you are making this particular recipe, browning the butter is worth the extra few minutes.
What Should I Use for the White Filling?
Thick white chocolate bar pieces work very well.
You can also use firm white chocolate fudge.
The important thing is choosing something substantial enough to remain concentrated in the center rather than disappearing into the batter.
Can I Use White Chocolate Chips?
You can, but chips will not produce the same dramatic center.
They tend to stay as smaller individual pockets rather than creating one thick creamy layer.
Why Did My Filling Leak Out?
The filling was probably too close to the edge.
Always leave a border of plain blondie batter around the perimeter.
Also make sure the top batter completely covers the filling before baking.
Why Are My Blondies Dry?
The most common reason is overbaking.
Remove them when the center is still slightly soft and the toothpick shows moist crumbs.
Using too much flour can also cause dry blondies, so weighing the flour is recommended.
Why Are My Blondies Cakey?
Too much flour, excessive mixing, or overbaking can all push blondies toward a cakey texture.
This recipe does not need baking powder or baking soda because the goal is a dense, chewy bar.
Can I Make Them in a 9 x 9-Inch Pan?
Yes.
The blondies will be thinner and will bake faster.
Start checking several minutes earlier.
An 8 x 8-inch pan is preferable if you want a thick bar with a substantial creamy center.
What to Serve With Stuffed Blondies
These bars are rich, so uncomplicated pairings work best:
- Cold milk
- Hot coffee
- Espresso
- Vanilla ice cream
- Fresh strawberries
- Fresh raspberries
- Lightly whipped cream
- Salted caramel ice cream
For an especially indulgent dessert, warm one blondie for a few seconds and serve it with vanilla ice cream.
Make-Ahead Tips
These blondies are excellent made one day ahead.
The texture becomes even denser and chewier once they have completely cooled.
You can bake the entire pan, cool it fully, and keep it covered until the following day.
If presentation matters, wait to slice until shortly before serving.
Storage
Room Temperature
Store completely cooled blondies in an airtight container for up to 3 days if your chosen filling is shelf-stable chocolate or fudge.
Refrigerator
Refrigerate for up to 5 days for longer storage.
The white chocolate center will become firmer when cold, so let the blondies return toward room temperature before serving if you prefer a creamy center.
Freezer
Wrap individual pieces tightly and freeze for up to 2 months.
Thaw at room temperature or overnight in the refrigerator.
How to Reheat
For that freshly baked, creamy-center texture, microwave one blondie for approximately 8–12 seconds.
The white chocolate filling can become very hot, so avoid overheating.
For several pieces, warm at 300°F (150°C) for about 5–7 minutes.
Stuffed Brown Butter Blondies Recipe Card
Prep Time: 20 minutes
Bake Time: 28–35 minutes
Cooling Time: 1–2 hours
Yield: 9 large or 16 smaller blondies
Pan: 8 x 8-inch metal square pan
Oven: 350°F (175°C)
Ingredients
Blondie Batter
- 1 cup (226g) unsalted butter
- 1¾ cups (about 350g) packed light brown sugar
- 2 large eggs
- 2 cups (240g) all-purpose flour
- ½ teaspoon fine salt
Filling
- About 8 ounces (225g) thick white chocolate blocks or firm white fudge pieces
Optional
- Flaky sea salt
- Melted white chocolate for drizzling
Instructions
- Preheat the oven to 350°F (175°C) and line an 8 x 8-inch square metal pan with parchment paper.
- Add the butter to a saucepan and cook over medium heat until deeply golden with amber-brown milk solids and a nutty aroma.
- Immediately transfer the browned butter and all toasted milk solids to a mixing bowl. Cool for about 10 minutes.
- Add the brown sugar and whisk until thoroughly combined.
- Add the eggs and whisk vigorously for 45–60 seconds until the mixture looks thicker and smoother.
- Add the flour and salt and fold gently until a thick blondie batter forms.
- Spread half of the batter evenly into the same parchment-lined square pan.
- Arrange the thick white chocolate or white fudge pieces evenly across the center, leaving about a ½-inch border around the edges.
- Cover completely with the remaining blondie batter and smooth the top.
- Place the same pan into the oven and bake for 28–35 minutes, until the top is deep golden and crackly and the edges are set while the center remains slightly soft.
- Remove the same pan from the oven and cool for at least 45–60 minutes.
- Lift out using the parchment, slice, and gently pull one piece apart to reveal the creamy center.
Notes
- Butter: Keep all of the browned milk solids; they contain much of the flavor.
- Brown sugar: Light brown sugar gives the classic caramel blondie flavor.
- Flour: 240g is recommended for accuracy.
- Filling: Thick white chocolate blocks create a more dramatic center than chips.
- Pan: An 8 x 8-inch metal pan gives thick, gooey bars.
- No leavener needed: The dense texture is intentional.
- Doneness: Moist crumbs are better than a completely clean toothpick.
- Cooling: The blondies firm substantially as they cool.
- Serving texture: Serve slightly warm for a softer creamy center or fully cooled for cleaner bakery-style cuts.
- Presentation: Leave the top simple and deeply golden so the pale creamy filling becomes the visual surprise when a bar is cut open.